Home
HomeHow to build cross-platform desktop apps with Electron.js and web tech in 2026?
Are you a web developer interested in extending your expertise to desktop application development? Electron.js is the perfect solution. This robust framework enables you to use your current HTML, CSS, and JavaScript skills to build cross-platform desktop applications that work smoothly on macOS, Windows, and Linux. This detailed guide offers a solid introduction to Electron.js, explaining its fundamental ideas, essential parts, and the initial steps to create your own desktop apps.
Key Points for Electron.js Beginners
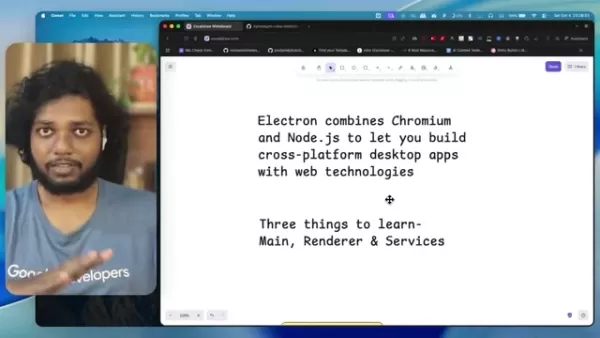
Electron.js merges Chromium and Node.js, making it possible to develop cross-platform apps using familiar web technologies.
Get to know the three main parts: the Main process, the Renderer process, and Services.
The Main process controls the application's lifecycle, menus, and communication between processes (IPC).
The Renderer process manages the user interface with HTML, CSS, and JavaScript (or frameworks such as React).
Services take care of background operations and native add-ons, helping to keep the UI code organized and secure.
IPC facilitates communication between the Main and Renderer processes, which is crucial for using Node.js APIs from the user interface.
Electron.js benefits from strong community backing, offering plenty of learning materials and libraries.
Applications like VS Code, Figma, Slack, and Discord are built on Electron, demonstrating its flexibility and capability.
Electron.js works well with Tailwind CSS and Shadcn/ui for enhanced user interface design.
Employing services to maintain clean UI code is key to avoiding security problems.
Understanding Electron.js Fundamentals
What Exactly Is Electron.js?
Electron.js is an open-source framework created by GitHub for developing desktop applications using HTML, CSS, and JavaScript. **

** It lets developers apply web technologies to produce native applications compatible with multiple platforms, including macOS, Windows, and Linux. Electron accomplishes this by integrating Chromium, the open-source browser project that powers Google Chrome, and Node.js, a JavaScript runtime, into a single application package.
Consider Electron as a link between web development and the desktop application field. It offers a comfortable setting for web developers to craft powerful desktop apps without having to master platform-specific languages or APIs.
The central idea is that Electron.js combines Chromium for the user interface and Node.js for backend operations. If you have experience with Chrome, Brave, or other Chromium-based browsers, you are already aware of the capabilities of Chromium's rendering engine. Node.js introduces server-side functionality to the desktop application, enabling developers to incorporate various Node.js packages into their projects.
Key Components of an Electron.js Application
To work efficiently with Electron.js, understanding its three primary components is vital:
- Main Process: The main process acts as the starting point of your Electron application. **
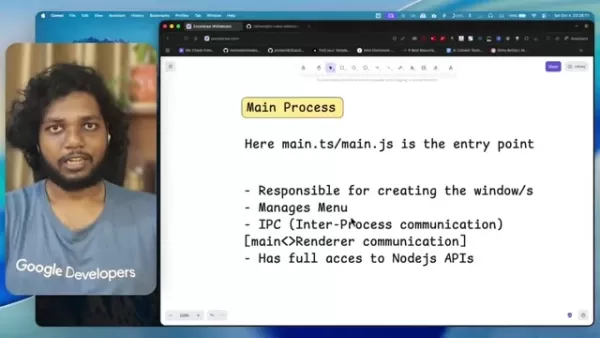
** It handles creating and managing the application's windows, the menu bar, and inter-process communication (IPC). Typically running in a Node.js environment, the main process has complete access to Node.js APIs.
- Renderer Process: Every window in an Electron application operates in its own renderer process. This process is in charge of displaying the user interface with HTML, CSS, and JavaScript. You can use well-known JavaScript frameworks like React, Angular, or Vue.js within the renderer process. **** However, for security purposes, the renderer process has restricted direct access to Node.js APIs. Inter-process communication (IPC) is necessary to utilize Node's features.
- Services: Services are independent modules that manage background tasks or domain-specific logic. **** They are useful for activities such as file system access, hardware interaction, or complex computations. Services aid in keeping the renderer process tidy and secure by isolating sensitive operations. They interact with the renderer process via IPC.
By grasping how these three components collaborate, you can structure your Electron.js application effectively and build a strong, maintainable codebase.
Examples of Applications Built with Electron.js
Popular Applications Leveraging Electron.js
Electron.js has gained popularity as a tool for creating desktop applications in various sectors. Its adaptability and user-friendliness have resulted in many well-known and widely used applications. Here are some prominent examples:
- Visual Studio Code (VS Code): Microsoft's widely-used code editor is constructed with Electron. **
** This is probably the most recognized application built with Electron. It offers developers a powerful and customizable setting for coding and debugging. It provides tools for a variety of programming languages.
- Figma: This collaborative interface design tool employs Electron to provide a uniform experience across different operating systems. Figma enables design teams to work together on projects in real time.
- Slack: The popular messaging and collaboration platform depends on Electron for its desktop client, ensuring smooth communication among teams. It uses Electron to let users interact via text or video.
- Discord: This voice and text chat application, popular among gamers and online communities, uses Electron for its desktop app, delivering a rich and engaging user experience. It is often the choice for gamers and various online groups.
- Notion: This all-in-one workspace and productivity application allows users to perform numerous tasks like note-taking, project management, and task tracking. Notion uses Electron to build its user interface across different platforms.
- Other Apps: There are also applications such as Cursor, Windsurf, Tray AI, Fluently, and many other popular software options that utilize Electron.js. ****
These are just a few instances, and the list keeps expanding as more developers recognize the advantages of using Electron.js.
Getting Started with Electron.js: Essential Steps
Setting Up Your Development Environment
Before you begin constructing Electron.js applications, you need to prepare your development environment. Here's the process:
- Install Node.js and npm: Electron.js depends on Node.js and npm (Node Package Manager). Download and install the most recent LTS (Long Term Support) version of Node.js from the official website (https://nodejs.org/). npm is included with Node.js.
- Create a Project Directory: Establish a new directory for your Electron.js project.
- Initialize Your Project: Open your terminal or command prompt, go to your project directory, and execute the command
npm init. This will lead you through creating a package.json file, which manages your project's dependencies and metadata. - Install Electron.js: Install Electron.js as a development dependency using the command
npm install electron --save-dev.
After completing these steps, you are set to begin building your Electron.js application.
Creating Your First Electron.js Application
Let's build a simple Electron.js application to introduce you to the core concepts:
- Create
main.js: This file acts as the entry point for your application's main process. It is responsible for creating windows and handling application events. 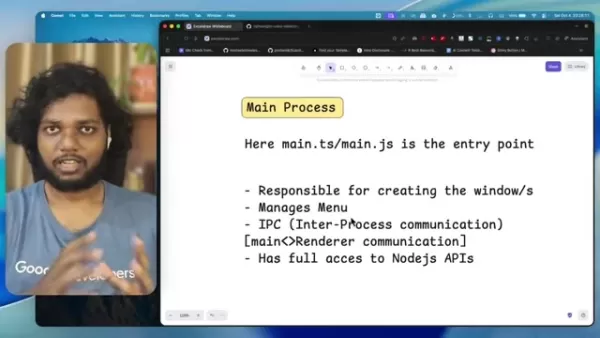
Create a file named main.js in your project directory and insert the following code:
const { app, BrowserWindow } = require('electron');function createWindow () {const win = new BrowserWindow({width: 800,height: 600,webPreferences: {nodeIntegration: true}})win.loadFile('index.html')}app.whenReady().then(createWindow)app.on('window-all-closed', () => {if (process.platform !== 'darwin') {app.quit()}})app.on('activate', () => {if (BrowserWindow.getAllWindows().length === 0) {createWindow()}})
- Create
index.html: This file defines the user interface for your application. Create a file named index.html in your project directory and insert the following code:
Hello World! Hello World!
We are using node , chrome , and electron .
- Modify
package.json: Add a start script to your package.json file to launch your application easily:
{"name": "my-electron-app","version": "1.0.0","description": "","main": "main.js","scripts": {"start": "electron ."},"keywords": [],"author": "","license": "ISC","devDependencies": {"electron": "^13.0.0"}}
- Run Your Application: In your terminal or command prompt, run the command
npm start. This will start your Electron.js application and show the "Hello World!" message in a window.
Well done! You have successfully built your first Electron.js application.
Weighing the Options: Electron.js Pros
and Cons
Pros
Cross-platform compatibility: Develop apps for macOS, Windows, and Linux from one codebase.
Web development familiarity: Use existing HTML, CSS, and JavaScript knowledge.
Large and active community: Benefit from extensive resources, libraries, and support.
Rapid development: Speed up development with web technologies and ready-made components.
Access to Node.js APIs: Use Node.js modules for native functionality.
Cons
Larger application size: Electron apps are often bigger because they include Chromium and Node.js runtimes.
Higher memory consumption: Electron apps can use more memory than native applications.
Security considerations: Demands careful security practices to prevent vulnerabilities.
Performance limitations: Might have performance constraints compared to native applications in some cases.
Frequently Asked Questions About Electron.js
What is IPC in Electron.js?
IPC stands for Inter-Process Communication. In Electron.js, it is the method that enables the main process and renderer processes to exchange information. Renderer processes, which manage the UI, are restricted from directly accessing Node.js APIs for security reasons. IPC offers a secure way for them to ask for services from the main process, which has full access to these APIs. IPC handles are defined in main.js to allow functions such as file system access from the renderer process.
What are some alternatives to Electron.js for building desktop apps?
Although Electron.js is a common choice, several alternatives are available, each with its own benefits and drawbacks. Some notable options include:Tauri: This framework uses a web view (similar to Chromium) but takes advantage of the operating system's native rendering engine, leading to smaller app sizes and improved performance.Flutter: This framework is Google's UI toolkit for creating natively compiled applications for mobile, web, and desktop from one codebase. It uses its own rendering engine, offering consistent performance across platforms..NET MAUI: This cross-platform framework from Microsoft lets you build native applications for Windows, macOS, iOS, and Android using C# and .NET.The right framework for you depends on your specific project needs, team skills, and performance objectives.
Explore Further: Related Questions About Electron.js
How do I package and distribute my Electron.js application?
Packaging and distributing your Electron.js application involves multiple steps:Choose a Packaging Tool: Several tools can package your Electron.js app for different platforms, such as Electron Packager, Electron Builder, and asar.Configure Your package.json: Set up the packaging tool in your package.json file, indicating the target platforms, application name, version, and other details.Package Your Application: Run the packaging tool to generate platform-specific packages (e.g., .app for macOS, .exe for Windows, .deb or .rpm for Linux).Sign Your Application (Optional but Recommended): Code signing is important for distributing your application securely, particularly on macOS and Windows. It confirms your application's authenticity and safeguards users from malware.Create an Installer or Distribution Package: For Windows, you can make an installer with tools like Inno Setup or NSIS. For macOS, you can create a .dmg distribution package.Once you have a packaged and signed application, you can distribute it via your website, the Mac App Store, the Windows Store, or other distribution channels.
Related article
 South Korea Breaks Ground on National AI Computing Center, Investing 2.5 Trillion Won with 2028 Target
South Korean outlet EtNews reports that groundbreaking for the Korea AI Computing Center (KOACC) took place on August 3 at the Solar City data center park in Sunan, Jeollanam-do. Backed by a total investment of 2.5 trillion KRW (roughly 11.838 billio
Six Tech Giants Back Linux Foundation With $12.5M to Tackle AI Vulnerability Noise
To tackle the flood of low-quality security reports produced by AI automation tools, six major tech companies—Anthropic, Amazon (AWS), GitHub, Google, Microsoft, and OpenAI—have collectively contributed $12.5 million in funding to Linux Foundation in
Musk Considered Leaving OpenAI to His Kids as Altman Testifies
This morning, OpenAI CEO Sam Altman took the stand to address former co-founder Elon Musk’s lawsuit challenging the company’s corporate structure.When asked about Musk’s claim that other founders “stole a charity” by launching a for-profit subsidiary
Related Special Topic Recommendations
Music composition
South Korea Breaks Ground on National AI Computing Center, Investing 2.5 Trillion Won with 2028 Target
South Korean outlet EtNews reports that groundbreaking for the Korea AI Computing Center (KOACC) took place on August 3 at the Solar City data center park in Sunan, Jeollanam-do. Backed by a total investment of 2.5 trillion KRW (roughly 11.838 billio
Six Tech Giants Back Linux Foundation With $12.5M to Tackle AI Vulnerability Noise
To tackle the flood of low-quality security reports produced by AI automation tools, six major tech companies—Anthropic, Amazon (AWS), GitHub, Google, Microsoft, and OpenAI—have collectively contributed $12.5 million in funding to Linux Foundation in
Musk Considered Leaving OpenAI to His Kids as Altman Testifies
This morning, OpenAI CEO Sam Altman took the stand to address former co-founder Elon Musk’s lawsuit challenging the company’s corporate structure.When asked about Musk’s claim that other founders “stole a charity” by launching a for-profit subsidiary
Related Special Topic Recommendations
Music composition
 AI Vocal Demo Tools for Songwriters, Hooks, Toplines, and Multilingual Draft Sessions
2026 Latest Best AI Vocal Demo Tools for Songwriters, Hook Creators, and Multi-Language Content Teams! XIX.AI has curated a top-rated list of powerful game-changing tools that go through rigorous real-world tests. You’ll find detailed free vs paid comparison data, comprehensive rankings, and must-try options to help you boost writing efficiency and unlock your creative potential. Explore now to discover your perfect tool for all your content needs!
 9 tools
 xix.ai
Business
Best AI Competitive Research Tools for Small Businesses
xix.ai
Business
Best AI Competitive Research Tools for Small Businesses
2026 Latest Best Top-rated AI Competitive Research Tools for Small Businesses! XIX.AI has curated a highly powerful game-changing collection, updated weekly with rigorous real-world tests and detailed rankings. You can find a comprehensive free vs paid comparison to help you identify the must-try tools that boost your productivity and give you a competitive edge. Explore now to discover your perfect tool!
9 tools
xix.ai
Image editing
Photoshop AI Retouch Tools for Ecommerce Apparel, Skin Cleanup, and Color Consistency
2026 Latest Best Photoshop AI retouch tools for ecommerce apparel, skin cleanup, and color consistency! This top-rated curated list features powerful game-changing solutions that help you boost writing efficiency, streamline content creation, and achieve perfect visual results effortlessly. Each tool has undergone real-world tests through weekly updated rankings, complete with free vs paid comparison details. Backed by XIX.AI, it’s the must-try guide for anyone aiming to unlock your AI edge. Explore now!
10 tools
xix.ai
Prompt
Best AI Prompt Libraries for ChatGPT Workflows
2026 Latest Best Top-Rated AI Prompt Libraries for optimizing all types of ChatGPT workflows. XIX.AI has curated a powerful, game-changing collection that goes through rigorous real-world tests to ensure top performance. You can find detailed free vs paid comparisons and expert rankings to help you choose the must-try tools that boost your productivity and unlock your AI edge. Explore now!
11 tools
xix.ai
Education and Learning
AI Quiz Builder Platforms for Teachers, Tutors, and Cohort-Based Learning Programs
2026 Latest Best AI Quiz Builder Platforms for Teachers, Tutors, and Cohort-Based Learning Programs! XIX.AI has curated a top-rated list of powerful game-changing tools that go through real-world tests to deliver accurate rankings. These must-try platforms help boost writing efficiency, streamline content creation, and simplify quiz design across all learning scenarios. Explore now to discover your perfect tool for unlocking your AI edge in teaching!
13 tools
xix.ai
code
AI Pull Request Review Tools for GitHub Teams Handling Refactors, Bugs, and Security Gaps
2026 Latest Best AI Pull Request Review Tools for GitHub Teams are here on XIX.AI! This top-rated curated list showcases powerful game-changing solutions that streamline refactoring, bug fixing, and security gap detection across all team workflows. Enjoy a free vs paid comparison along with real-world tests and detailed rankings to help you find the perfect tool that boosts productivity significantly. Explore now to unlock your AI edge!
12 tools
xix.ai

 Comments (0)
0/500
Comments (0)
0/500
Are you a web developer interested in extending your expertise to desktop application development? Electron.js is the perfect solution. This robust framework enables you to use your current HTML, CSS, and JavaScript skills to build cross-platform desktop applications that work smoothly on macOS, Windows, and Linux. This detailed guide offers a solid introduction to Electron.js, explaining its fundamental ideas, essential parts, and the initial steps to create your own desktop apps.
Key Points for Electron.js Beginners
Electron.js merges Chromium and Node.js, making it possible to develop cross-platform apps using familiar web technologies.
Get to know the three main parts: the Main process, the Renderer process, and Services.
The Main process controls the application's lifecycle, menus, and communication between processes (IPC).
The Renderer process manages the user interface with HTML, CSS, and JavaScript (or frameworks such as React).
Services take care of background operations and native add-ons, helping to keep the UI code organized and secure.
IPC facilitates communication between the Main and Renderer processes, which is crucial for using Node.js APIs from the user interface.
Electron.js benefits from strong community backing, offering plenty of learning materials and libraries.
Applications like VS Code, Figma, Slack, and Discord are built on Electron, demonstrating its flexibility and capability.
Electron.js works well with Tailwind CSS and Shadcn/ui for enhanced user interface design.
Employing services to maintain clean UI code is key to avoiding security problems.
Understanding Electron.js Fundamentals
What Exactly Is Electron.js?
Electron.js is an open-source framework created by GitHub for developing desktop applications using HTML, CSS, and JavaScript. **
** It lets developers apply web technologies to produce native applications compatible with multiple platforms, including macOS, Windows, and Linux. Electron accomplishes this by integrating Chromium, the open-source browser project that powers Google Chrome, and Node.js, a JavaScript runtime, into a single application package.
Consider Electron as a link between web development and the desktop application field. It offers a comfortable setting for web developers to craft powerful desktop apps without having to master platform-specific languages or APIs.
The central idea is that Electron.js combines Chromium for the user interface and Node.js for backend operations. If you have experience with Chrome, Brave, or other Chromium-based browsers, you are already aware of the capabilities of Chromium's rendering engine. Node.js introduces server-side functionality to the desktop application, enabling developers to incorporate various Node.js packages into their projects.
Key Components of an Electron.js Application
To work efficiently with Electron.js, understanding its three primary components is vital:
- Main Process: The main process acts as the starting point of your Electron application. **
** It handles creating and managing the application's windows, the menu bar, and inter-process communication (IPC). Typically running in a Node.js environment, the main process has complete access to Node.js APIs.
- Renderer Process: Every window in an Electron application operates in its own renderer process. This process is in charge of displaying the user interface with HTML, CSS, and JavaScript. You can use well-known JavaScript frameworks like React, Angular, or Vue.js within the renderer process. **** However, for security purposes, the renderer process has restricted direct access to Node.js APIs. Inter-process communication (IPC) is necessary to utilize Node's features.
- Services: Services are independent modules that manage background tasks or domain-specific logic. **** They are useful for activities such as file system access, hardware interaction, or complex computations. Services aid in keeping the renderer process tidy and secure by isolating sensitive operations. They interact with the renderer process via IPC.
By grasping how these three components collaborate, you can structure your Electron.js application effectively and build a strong, maintainable codebase.
Examples of Applications Built with Electron.js
Popular Applications Leveraging Electron.js
Electron.js has gained popularity as a tool for creating desktop applications in various sectors. Its adaptability and user-friendliness have resulted in many well-known and widely used applications. Here are some prominent examples:
- Visual Studio Code (VS Code): Microsoft's widely-used code editor is constructed with Electron. **
** This is probably the most recognized application built with Electron. It offers developers a powerful and customizable setting for coding and debugging. It provides tools for a variety of programming languages.
- Figma: This collaborative interface design tool employs Electron to provide a uniform experience across different operating systems. Figma enables design teams to work together on projects in real time.
- Slack: The popular messaging and collaboration platform depends on Electron for its desktop client, ensuring smooth communication among teams. It uses Electron to let users interact via text or video.
- Discord: This voice and text chat application, popular among gamers and online communities, uses Electron for its desktop app, delivering a rich and engaging user experience. It is often the choice for gamers and various online groups.
- Notion: This all-in-one workspace and productivity application allows users to perform numerous tasks like note-taking, project management, and task tracking. Notion uses Electron to build its user interface across different platforms.
- Other Apps: There are also applications such as Cursor, Windsurf, Tray AI, Fluently, and many other popular software options that utilize Electron.js. ****
These are just a few instances, and the list keeps expanding as more developers recognize the advantages of using Electron.js.
Getting Started with Electron.js: Essential Steps
Setting Up Your Development Environment
Before you begin constructing Electron.js applications, you need to prepare your development environment. Here's the process:
- Install Node.js and npm: Electron.js depends on Node.js and npm (Node Package Manager). Download and install the most recent LTS (Long Term Support) version of Node.js from the official website (https://nodejs.org/). npm is included with Node.js.
- Create a Project Directory: Establish a new directory for your Electron.js project.
- Initialize Your Project: Open your terminal or command prompt, go to your project directory, and execute the command
npm init. This will lead you through creating apackage.jsonfile, which manages your project's dependencies and metadata. - Install Electron.js: Install Electron.js as a development dependency using the command
npm install electron --save-dev.
After completing these steps, you are set to begin building your Electron.js application.
Creating Your First Electron.js Application
Let's build a simple Electron.js application to introduce you to the core concepts:
- Create
main.js: This file acts as the entry point for your application's main process. It is responsible for creating windows and handling application events.Create a file named
main.jsin your project directory and insert the following code:
const { app, BrowserWindow } = require('electron');function createWindow () {const win = new BrowserWindow({width: 800,height: 600,webPreferences: {nodeIntegration: true}})win.loadFile('index.html')}app.whenReady().then(createWindow)app.on('window-all-closed', () => {if (process.platform !== 'darwin') {app.quit()}})app.on('activate', () => {if (BrowserWindow.getAllWindows().length === 0) {createWindow()}})
- Create
index.html: This file defines the user interface for your application. Create a file namedindex.htmlin your project directory and insert the following code:
Hello World!
We are using node , chrome , and electron .
- Modify
package.json: Add astartscript to yourpackage.jsonfile to launch your application easily:
{"name": "my-electron-app","version": "1.0.0","description": "","main": "main.js","scripts": {"start": "electron ."},"keywords": [],"author": "","license": "ISC","devDependencies": {"electron": "^13.0.0"}}
- Run Your Application: In your terminal or command prompt, run the command
npm start. This will start your Electron.js application and show the "Hello World!" message in a window.
Well done! You have successfully built your first Electron.js application.
Weighing the Options: Electron.js Pros
and Cons
Pros
Cross-platform compatibility: Develop apps for macOS, Windows, and Linux from one codebase.
Web development familiarity: Use existing HTML, CSS, and JavaScript knowledge.
Large and active community: Benefit from extensive resources, libraries, and support.
Rapid development: Speed up development with web technologies and ready-made components.
Access to Node.js APIs: Use Node.js modules for native functionality.
Cons
Larger application size: Electron apps are often bigger because they include Chromium and Node.js runtimes.
Higher memory consumption: Electron apps can use more memory than native applications.
Security considerations: Demands careful security practices to prevent vulnerabilities.
Performance limitations: Might have performance constraints compared to native applications in some cases.
Frequently Asked Questions About Electron.js
What is IPC in Electron.js?
IPC stands for Inter-Process Communication. In Electron.js, it is the method that enables the main process and renderer processes to exchange information. Renderer processes, which manage the UI, are restricted from directly accessing Node.js APIs for security reasons. IPC offers a secure way for them to ask for services from the main process, which has full access to these APIs. IPC handles are defined in main.js to allow functions such as file system access from the renderer process.
What are some alternatives to Electron.js for building desktop apps?
Although Electron.js is a common choice, several alternatives are available, each with its own benefits and drawbacks. Some notable options include:Tauri: This framework uses a web view (similar to Chromium) but takes advantage of the operating system's native rendering engine, leading to smaller app sizes and improved performance.Flutter: This framework is Google's UI toolkit for creating natively compiled applications for mobile, web, and desktop from one codebase. It uses its own rendering engine, offering consistent performance across platforms..NET MAUI: This cross-platform framework from Microsoft lets you build native applications for Windows, macOS, iOS, and Android using C# and .NET.The right framework for you depends on your specific project needs, team skills, and performance objectives.
Explore Further: Related Questions About Electron.js
How do I package and distribute my Electron.js application?
Packaging and distributing your Electron.js application involves multiple steps:Choose a Packaging Tool: Several tools can package your Electron.js app for different platforms, such as Electron Packager, Electron Builder, and asar.Configure Your package.json: Set up the packaging tool in your package.json file, indicating the target platforms, application name, version, and other details.Package Your Application: Run the packaging tool to generate platform-specific packages (e.g., .app for macOS, .exe for Windows, .deb or .rpm for Linux).Sign Your Application (Optional but Recommended): Code signing is important for distributing your application securely, particularly on macOS and Windows. It confirms your application's authenticity and safeguards users from malware.Create an Installer or Distribution Package: For Windows, you can make an installer with tools like Inno Setup or NSIS. For macOS, you can create a .dmg distribution package.Once you have a packaged and signed application, you can distribute it via your website, the Mac App Store, the Windows Store, or other distribution channels.








 South Korea Breaks Ground on National AI Computing Center, Investing 2.5 Trillion Won with 2028 Target
South Korean outlet EtNews reports that groundbreaking for the Korea AI Computing Center (KOACC) took place on August 3 at the Solar City data center park in Sunan, Jeollanam-do. Backed by a total investment of 2.5 trillion KRW (roughly 11.838 billio
South Korea Breaks Ground on National AI Computing Center, Investing 2.5 Trillion Won with 2028 Target
South Korean outlet EtNews reports that groundbreaking for the Korea AI Computing Center (KOACC) took place on August 3 at the Solar City data center park in Sunan, Jeollanam-do. Backed by a total investment of 2.5 trillion KRW (roughly 11.838 billio
 Six Tech Giants Back Linux Foundation With $12.5M to Tackle AI Vulnerability Noise
To tackle the flood of low-quality security reports produced by AI automation tools, six major tech companies—Anthropic, Amazon (AWS), GitHub, Google, Microsoft, and OpenAI—have collectively contributed $12.5 million in funding to Linux Foundation in
Six Tech Giants Back Linux Foundation With $12.5M to Tackle AI Vulnerability Noise
To tackle the flood of low-quality security reports produced by AI automation tools, six major tech companies—Anthropic, Amazon (AWS), GitHub, Google, Microsoft, and OpenAI—have collectively contributed $12.5 million in funding to Linux Foundation in
 Musk Considered Leaving OpenAI to His Kids as Altman Testifies
This morning, OpenAI CEO Sam Altman took the stand to address former co-founder Elon Musk’s lawsuit challenging the company’s corporate structure.When asked about Musk’s claim that other founders “stole a charity” by launching a for-profit subsidiary
Musk Considered Leaving OpenAI to His Kids as Altman Testifies
This morning, OpenAI CEO Sam Altman took the stand to address former co-founder Elon Musk’s lawsuit challenging the company’s corporate structure.When asked about Musk’s claim that other founders “stole a charity” by launching a for-profit subsidiary

2026 Latest Best AI Vocal Demo Tools for Songwriters, Hook Creators, and Multi-Language Content Teams! XIX.AI has curated a top-rated list of powerful game-changing tools that go through rigorous real-world tests. You’ll find detailed free vs paid comparison data, comprehensive rankings, and must-try options to help you boost writing efficiency and unlock your creative potential. Explore now to discover your perfect tool for all your content needs!
9 tools
xix.ai

2026 Latest Best Top-rated AI Competitive Research Tools for Small Businesses! XIX.AI has curated a highly powerful game-changing collection, updated weekly with rigorous real-world tests and detailed rankings. You can find a comprehensive free vs paid comparison to help you identify the must-try tools that boost your productivity and give you a competitive edge. Explore now to discover your perfect tool!
9 tools
xix.ai

2026 Latest Best Photoshop AI retouch tools for ecommerce apparel, skin cleanup, and color consistency! This top-rated curated list features powerful game-changing solutions that help you boost writing efficiency, streamline content creation, and achieve perfect visual results effortlessly. Each tool has undergone real-world tests through weekly updated rankings, complete with free vs paid comparison details. Backed by XIX.AI, it’s the must-try guide for anyone aiming to unlock your AI edge. Explore now!
10 tools
xix.ai
2026 Latest Best Top-Rated AI Prompt Libraries for optimizing all types of ChatGPT workflows. XIX.AI has curated a powerful, game-changing collection that goes through rigorous real-world tests to ensure top performance. You can find detailed free vs paid comparisons and expert rankings to help you choose the must-try tools that boost your productivity and unlock your AI edge. Explore now!
11 tools
xix.ai

2026 Latest Best AI Quiz Builder Platforms for Teachers, Tutors, and Cohort-Based Learning Programs! XIX.AI has curated a top-rated list of powerful game-changing tools that go through real-world tests to deliver accurate rankings. These must-try platforms help boost writing efficiency, streamline content creation, and simplify quiz design across all learning scenarios. Explore now to discover your perfect tool for unlocking your AI edge in teaching!
13 tools
xix.ai
2026 Latest Best AI Pull Request Review Tools for GitHub Teams are here on XIX.AI! This top-rated curated list showcases powerful game-changing solutions that streamline refactoring, bug fixing, and security gap detection across all team workflows. Enjoy a free vs paid comparison along with real-world tests and detailed rankings to help you find the perfect tool that boosts productivity significantly. Explore now to unlock your AI edge!
12 tools
xix.ai