Home
HomeStoryboarder.ai Guide: Uploading and Converting Images
This tutorial guides you through using the upload and image-to-image features in Storyboarder.ai. These tools provide the flexibility to incorporate external images and refine your existing storyboards, helping you bring your creative vision to life.
Key Points
Understand the 'Upload Image' feature in Storyboarder.ai.
Learn to use 'Simple Image Upload' for directly inserting images.
Discover how the 'Image-to-Image' feature enables creative transformations.
Adjust 'Image Strength' to find the right balance between AI style and original image detail.
See practical examples of replacing and enhancing storyboard frames with custom images.
Introduction to Image Uploading in Storyboarder.ai
Overview of the Upload Image Feature
Storyboarder.ai's versatile 'Upload Image' feature lets you bring external images into your storyboard. This is essential for personalizing projects, visualizing unique scenes, and ensuring your storyboard aligns with your creative ideas. The 'Upload Image' function includes two main modes: Simple Image Upload and Image-to-Image, each serving different creative needs. These tools give you significant control over your storyboard's visual content, boosting both efficiency and creative potential. Using this feature accelerates your brainstorming and iteration workflow, allowing you to quickly visualize scenarios and then fine-tune them with AI for limitless possibilities. It's a core feature for customizing any project.
Mastering these upload options helps you build more compelling and visually accurate storyboards, bridging the gap between your imagination and the final project visuals. These integrated tools streamline the creative process, ensuring each frame precisely reflects your vision. Greater skill with image uploading leads to a more professional final project and more satisfying results.
Simple Image Upload: Direct Insertion
How to Use Simple Image Upload
The Simple Image Upload option lets you directly insert an image file into a selected storyboard frame. This mode is best when you have a specific image you want to use as-is, without AI-driven modifications. It's the fastest way to get your chosen image into a frame. Follow this step-by-step guide:
Accessing the Upload Function:First, go to your project's storyboard view in Storyboarder.ai. Find the frame you want to change and click the 'Upload' icon, typically shown as an upward-pointing arrow. This opens the 'Upload Image' dialog box.
Selecting the Image File:
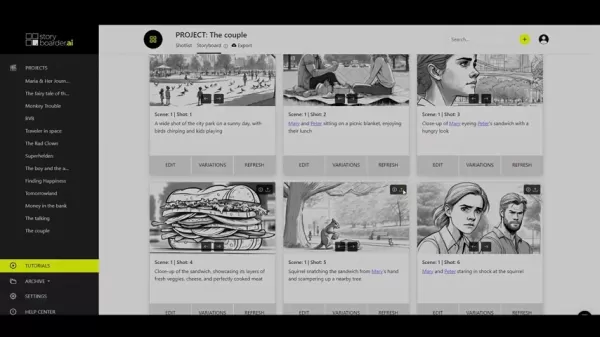
In the 'Upload Image' dialog box, you'll see an area labeled 'Image File' with the prompt 'Select file or drag and drop.' Click this area to open your computer's file explorer, or simply drag and drop your image file directly into the space. The system supports common formats like JPEG, PNG, and GIF.
Choosing Simple Image Upload:Once your image file is selected, confirm that the 'Simple Image Upload' option is chosen. This is usually the default setting for standard imports.
Initiating the Upload: After confirming 'Simple Image Upload' is selected, click the 'Upload' button at the bottom of the dialog box. Storyboarder.ai will then process and place your selected image into the storyboard frame. The image appears exactly as you uploaded it, with no AI transformations.
This method's simplicity makes it ideal for adding pre-made artwork, reference images, or specific visual elements directly to your storyboard, giving you full control over the frame's final look.
Best Practices: Using high-resolution images ensures your storyboard looks sharp and professional. Also, match your image's aspect ratio to the frame to prevent stretching. Simple Image Upload works well for adding detailed backgrounds, character designs, or specific props.
Detailed Steps for Image-to-Image Transformation
Leveraging Image-to-Image for AI-Driven Refinement
The Image-to-Image feature offers an advanced approach, uploading an image and having Storyboarder.ai transform it. This blends your original image's essence with the AI's scene understanding and style settings. It's excellent for maintaining a consistent visual style across your storyboard while incorporating unique elements from your uploads.
Accessing the Upload Function: As with the simple upload, start in the storyboard view and select your target frame. Click the 'Upload' icon to open the dialog box.
Selecting the Image File: Choose your image file the same way as the simple upload, either by clicking the designated area or by dragging and dropping.
Choosing Image-to-Image:
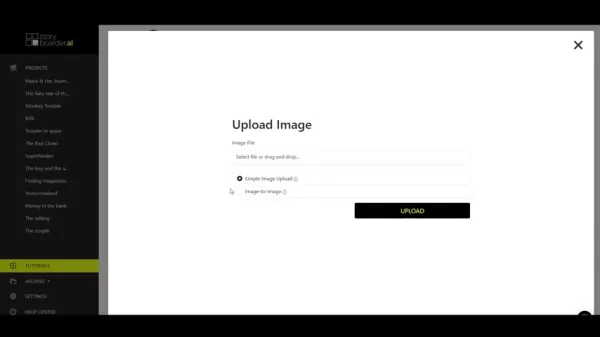
In the 'Upload Image' dialog box, select the 'Image-to-Image' option. This activates the AI transformation settings for customization.
Adjusting Image Strength: A key setting here is the 'Image Strength' slider. It controls the balance between your original image and the storyboard style. Dragging the slider toward 'Closer to the Image' (around 40%) preserves more details from your upload, while moving it toward 'Closer to the Storyboard Style' (around 20%) emphasizes the AI's style. Experiment to find the ideal blend; a middle ground often produces the most appealing visuals.
Initiating the Upload: After setting the 'Image Strength,' click the 'Upload' button. Storyboarder.ai will process the image, transforming it based on your settings and integrating it into the frame.
Reviewing and Refining: Once the transformed image appears, review it and make adjustments if needed. You can re-upload the same image with different 'Image Strength' values until you achieve the perfect mix.
Best Practices: For best results, use images relevant to the scene. A higher image strength is suitable for preserving unique textures or patterns, while a lower strength ensures better stylistic harmony. The goal is to enhance your storyboard while keeping the visual narrative coherent.
Storyboarder.ai Pricing
Cost and subscription
Storyboarder.ai offers different pricing tiers based on features and functionality. The current plans include:
- Free plan: Offers basic functionality to help new users get acquainted with the tool.
- Subscription Plan: Provides access to premium features and cloud support.
For the latest pricing details and subscription options, please visit the official Storyboarder.AI website. [website]
Evaluating Storyboarder.ai: Weighing the Pros and Cons
Pros
AI-powered image generation dramatically speeds up the storyboarding process.
The Image-to-Image feature allows seamless blending of external visuals with AI-generated content.
Customizable styles and filters let you create storyboards in various artistic styles.
Shotlist management tools help effectively organize and manage shot details.
Collaboration tools facilitate teamwork and keep everyone aligned on the visual narrative.
Cons
AI-generated images may sometimes need manual tweaking to match a specific creative vision.
Reliance on AI might limit creative input for users who prefer traditional, hands-on methods.
Advanced features often require a paid subscription, which can restrict access for free users.
The quality of AI output depends on the accuracy of your scene descriptions and style choices.
Users unfamiliar with AI tools might face a learning curve.
Key Features of Storyboarder.ai
Extensive Functionality Set
Storyboarder.ai comes packed with features designed to streamline and enhance storyboard creation:
- AI-Powered Image Generation: Automatically create storyboard images from scene descriptions.
- Image Upload & Transformation: Easily upload external images and blend them with the AI's style.
- Shotlist Management: Organize and manage details like scene descriptions, equipment, and shot types.
- Export Options: Export your storyboards in multiple formats, including PDF, JPG, and video.
- Collaboration Tools: Share and collaborate on storyboards with team members in real-time.
- Customizable Styles: Tailor the visual style of your storyboard using different artistic filters and effects.
Versatile Use Cases for Storyboarder.ai
Broad applications across industries
Storyboarder.ai is used across various industries to visualize and plan visual content:
- Film & Television: Pre-visualize scenes, plan camera angles, and storyboard entire productions.
- Advertising: Create storyboards for commercials, marketing videos, and advertising campaigns.
- Animation: Plan animation sequences, character movements, and scene layouts.
- Game Development: Visualize game cinematics, cutscenes, and in-game events.
- Education: Teach visual storytelling, film production, and animation techniques.
By utilizing Storyboarder.ai, professionals and creatives can effectively communicate their ideas, streamline production, and bring their visions to life with clarity.
Frequently Asked Questions
What file formats does Storyboarder.ai support for image uploads?
Storyboarder.ai supports various image formats, including JPEG, PNG, and GIF, ensuring compatibility with most common image files.
How can I ensure that the uploaded image maintains its original aspect ratio?
To avoid stretching or distortion, ensure your uploaded image's aspect ratio matches that of the storyboard frame. You may need to crop or resize your image beforehand.
Can I use Image-to-Image to add specific textures or patterns to my storyboard?
Yes, the Image-to-Image function is ideal for incorporating unique textures or patterns. Use a higher 'Image Strength' setting to retain more detail from your uploaded texture image.
What is the best way to achieve stylistic consistency when using Image-to-Image?
For a consistent style, use a lower 'Image Strength' setting. This emphasizes the AI's stylistic interpretation and blends your uploaded image smoothly with the storyboard's overall aesthetic.
Is it possible to revert back to the original AI-generated image after uploading an image?
Yes, Storyboarder.ai typically allows you to revert to the original AI-generated image. Look for a 'Revert' or 'Refresh' option in the frame's editing menu.
Can I adjust the image strength after uploading the image?
Yes, you can adjust the image strength. This feature allows for iterative refinements, but it only applies to images uploaded using the "Image-to-Image" function.
Related Questions
How does Storyboarder.ai compare to other storyboarding tools?
Storyboarder.ai distinguishes itself with AI-powered image generation and transformation, offering a unique combination of automation and creative freedom. Compared to traditional tools, it makes storyboarding faster and more efficient. It’s an all-in-one editor and creation tool, reducing the need for other software. Its powerful AI can generate countless outcomes based on your input, and its export features make sharing projects straightforward.
Can Storyboarder.ai generate storyboards in different artistic styles?
Yes, Storyboarder.ai provides customizable styles and filters, enabling you to create storyboards in a variety of artistic looks, from simple sketches to cinematic frames. This flexibility improves visual appeal and ensures the storyboard matches your project's aesthetic.
What are the benefits of using AI in storyboarding?
Using AI for storyboarding offers several key advantages: Speed: AI automates the creation of images, saving significant time. Inspiration: AI can produce unique visuals that spark new creative directions. Consistency: AI helps maintain a uniform style across all storyboard frames. Accessibility: AI makes storyboarding achievable for users with varying levels of artistic skill.
How can I collaborate with team members on storyboards created with Storyboarder.ai?
Storyboarder.ai includes collaboration tools that let team members share and work on storyboards together in real-time. This promotes teamwork and ensures everyone has a shared understanding of the visual story.
Related article
 Swedish AI Startup Lovable Eyes $13.2 Billion Valuation After Major Funding Round
As AI-driven coding tools gain traction, Swedish startup Lovable has secured a major funding round. The company aims to raise $3 billion, potentially boosting its valuation to $13.2 billion—double the $6.6 billion recorded last December. Menlo Ventur
Google Tests Remy AI Agent for Gemini as Focus Shifts to User Control
According to Business Insider, Google is testing Remy, a new AI personal agent for Gemini. This tool aims to execute tasks on behalf of users, streamlining both professional workflows and daily routines.Currently, Remy is undergoing testing in an int
How to fix Core Web Vitals for better SEO rankings
Streamline Report Card Comments with AI ToolsIntroductionAI Tools for Generating Report Card CommentsMagic SchoolAlmanac AIChat GPTUsing Magic School to Generate Report Card CommentsLogging into Magic SchoolSelecting the Report Card Comments ToolCust
Related Special Topic Recommendations
writing
Swedish AI Startup Lovable Eyes $13.2 Billion Valuation After Major Funding Round
As AI-driven coding tools gain traction, Swedish startup Lovable has secured a major funding round. The company aims to raise $3 billion, potentially boosting its valuation to $13.2 billion—double the $6.6 billion recorded last December. Menlo Ventur
Google Tests Remy AI Agent for Gemini as Focus Shifts to User Control
According to Business Insider, Google is testing Remy, a new AI personal agent for Gemini. This tool aims to execute tasks on behalf of users, streamlining both professional workflows and daily routines.Currently, Remy is undergoing testing in an int
How to fix Core Web Vitals for better SEO rankings
Streamline Report Card Comments with AI ToolsIntroductionAI Tools for Generating Report Card CommentsMagic SchoolAlmanac AIChat GPTUsing Magic School to Generate Report Card CommentsLogging into Magic SchoolSelecting the Report Card Comments ToolCust
Related Special Topic Recommendations
writing
 Best AI Outline Generators for Long-Form SEO Articles
2026 Latest Best Top-Rated AI Outline Generators for Long-Form SEO Articles, meticulously curated by XIX.AI. These powerful tools offer game-changing assistance in creating high-quality content quickly, boosting writing efficiency significantly. Get a free vs paid comparison along with real-world tests and detailed rankings to help you find the must-try option that suits your needs. Explore now to unlock your AI edge.
 8 tools
 xix.ai
Education and Learning
AI Study Tools for Homework and Exam Prep
xix.ai
Education and Learning
AI Study Tools for Homework and Exam Prep
2026 Latest Best AI Study Tools for Homework and Exam Prep! XIX.AI curates a top-rated list of powerful, game-changing tools that help students boost productivity, streamline homework completion, and ace exams through real-world tests. Get a free vs paid comparison, detailed rankings, and must-try options to unlock your AI edge. Explore now!
10 tools
xix.ai
Music composition
AI Vocal Demo Tools for Songwriters, Hooks, Toplines, and Multilingual Draft Sessions
2026 Latest Best AI Vocal Demo Tools for Songwriters, Hook Creators, and Multi-Language Content Teams! XIX.AI has curated a top-rated list of powerful game-changing tools that go through rigorous real-world tests. You’ll find detailed free vs paid comparison data, comprehensive rankings, and must-try options to help you boost writing efficiency and unlock your creative potential. Explore now to discover your perfect tool for all your content needs!
9 tools
xix.ai
Business
Best AI Competitive Research Tools for Small Businesses
2026 Latest Best Top-rated AI Competitive Research Tools for Small Businesses! XIX.AI has curated a highly powerful game-changing collection, updated weekly with rigorous real-world tests and detailed rankings. You can find a comprehensive free vs paid comparison to help you identify the must-try tools that boost your productivity and give you a competitive edge. Explore now to discover your perfect tool!
9 tools
xix.ai
Image editing
Photoshop AI Retouch Tools for Ecommerce Apparel, Skin Cleanup, and Color Consistency
2026 Latest Best Photoshop AI retouch tools for ecommerce apparel, skin cleanup, and color consistency! This top-rated curated list features powerful game-changing solutions that help you boost writing efficiency, streamline content creation, and achieve perfect visual results effortlessly. Each tool has undergone real-world tests through weekly updated rankings, complete with free vs paid comparison details. Backed by XIX.AI, it’s the must-try guide for anyone aiming to unlock your AI edge. Explore now!
10 tools
xix.ai
Prompt
Best AI Prompt Libraries for ChatGPT Workflows
2026 Latest Best Top-Rated AI Prompt Libraries for optimizing all types of ChatGPT workflows. XIX.AI has curated a powerful, game-changing collection that goes through rigorous real-world tests to ensure top performance. You can find detailed free vs paid comparisons and expert rankings to help you choose the must-try tools that boost your productivity and unlock your AI edge. Explore now!
11 tools
xix.ai

 Comments (3)
0/500
Comments (3)
0/500
![FrankRoberts]()
Ich frage mich, ob solche KI-Tools bald die Arbeit von Storyboard-Künstlern ersetzen werden? 🤔 Einerseits praktisch, andererseits etwas beängstigend... Aber die Tutorials scheinen gut erklärt!
![EricRoberts]()
このチュートリアル、すごく役に立ちそう!外部画像を取り込んでストーリーボードをブラッシュアップできる機能は、アイデアの具体化にぴったりだね。AIツールがここまでクリエイティブな作業をサポートしてくれる時代になったのか…少し驚き。でも、生成された画像の著作権問題はどうなるんだろう?そこがちょっと気になるかも😅
![EdwardTaylor]()
このツール、外部画像の取り込みができるのがすごく便利だね!ストーリーボードの調整がこんなに柔軟にできるなら、アイデアの具現化が格段に楽になりそう。ただ、無料版だとどのくらい使えるのかな?🤔 料金プランが気になる…
This tutorial guides you through using the upload and image-to-image features in Storyboarder.ai. These tools provide the flexibility to incorporate external images and refine your existing storyboards, helping you bring your creative vision to life.
Key Points
Understand the 'Upload Image' feature in Storyboarder.ai.
Learn to use 'Simple Image Upload' for directly inserting images.
Discover how the 'Image-to-Image' feature enables creative transformations.
Adjust 'Image Strength' to find the right balance between AI style and original image detail.
See practical examples of replacing and enhancing storyboard frames with custom images.
Introduction to Image Uploading in Storyboarder.ai
Overview of the Upload Image Feature
Storyboarder.ai's versatile 'Upload Image' feature lets you bring external images into your storyboard. This is essential for personalizing projects, visualizing unique scenes, and ensuring your storyboard aligns with your creative ideas. The 'Upload Image' function includes two main modes: Simple Image Upload and Image-to-Image, each serving different creative needs. These tools give you significant control over your storyboard's visual content, boosting both efficiency and creative potential. Using this feature accelerates your brainstorming and iteration workflow, allowing you to quickly visualize scenarios and then fine-tune them with AI for limitless possibilities. It's a core feature for customizing any project.
Mastering these upload options helps you build more compelling and visually accurate storyboards, bridging the gap between your imagination and the final project visuals. These integrated tools streamline the creative process, ensuring each frame precisely reflects your vision. Greater skill with image uploading leads to a more professional final project and more satisfying results.
Simple Image Upload: Direct Insertion
How to Use Simple Image Upload
The Simple Image Upload option lets you directly insert an image file into a selected storyboard frame. This mode is best when you have a specific image you want to use as-is, without AI-driven modifications. It's the fastest way to get your chosen image into a frame. Follow this step-by-step guide:
Accessing the Upload Function:First, go to your project's storyboard view in Storyboarder.ai. Find the frame you want to change and click the 'Upload' icon, typically shown as an upward-pointing arrow. This opens the 'Upload Image' dialog box.
Selecting the Image File:
In the 'Upload Image' dialog box, you'll see an area labeled 'Image File' with the prompt 'Select file or drag and drop.' Click this area to open your computer's file explorer, or simply drag and drop your image file directly into the space. The system supports common formats like JPEG, PNG, and GIF.
Choosing Simple Image Upload:Once your image file is selected, confirm that the 'Simple Image Upload' option is chosen. This is usually the default setting for standard imports.
Initiating the Upload: After confirming 'Simple Image Upload' is selected, click the 'Upload' button at the bottom of the dialog box. Storyboarder.ai will then process and place your selected image into the storyboard frame. The image appears exactly as you uploaded it, with no AI transformations.
This method's simplicity makes it ideal for adding pre-made artwork, reference images, or specific visual elements directly to your storyboard, giving you full control over the frame's final look.
Best Practices: Using high-resolution images ensures your storyboard looks sharp and professional. Also, match your image's aspect ratio to the frame to prevent stretching. Simple Image Upload works well for adding detailed backgrounds, character designs, or specific props.
Detailed Steps for Image-to-Image Transformation
Leveraging Image-to-Image for AI-Driven Refinement
The Image-to-Image feature offers an advanced approach, uploading an image and having Storyboarder.ai transform it. This blends your original image's essence with the AI's scene understanding and style settings. It's excellent for maintaining a consistent visual style across your storyboard while incorporating unique elements from your uploads.
Accessing the Upload Function: As with the simple upload, start in the storyboard view and select your target frame. Click the 'Upload' icon to open the dialog box.
Selecting the Image File: Choose your image file the same way as the simple upload, either by clicking the designated area or by dragging and dropping.
Choosing Image-to-Image:
In the 'Upload Image' dialog box, select the 'Image-to-Image' option. This activates the AI transformation settings for customization.
Adjusting Image Strength: A key setting here is the 'Image Strength' slider. It controls the balance between your original image and the storyboard style. Dragging the slider toward 'Closer to the Image' (around 40%) preserves more details from your upload, while moving it toward 'Closer to the Storyboard Style' (around 20%) emphasizes the AI's style. Experiment to find the ideal blend; a middle ground often produces the most appealing visuals.
Initiating the Upload: After setting the 'Image Strength,' click the 'Upload' button. Storyboarder.ai will process the image, transforming it based on your settings and integrating it into the frame.
Reviewing and Refining: Once the transformed image appears, review it and make adjustments if needed. You can re-upload the same image with different 'Image Strength' values until you achieve the perfect mix.
Best Practices: For best results, use images relevant to the scene. A higher image strength is suitable for preserving unique textures or patterns, while a lower strength ensures better stylistic harmony. The goal is to enhance your storyboard while keeping the visual narrative coherent.
Storyboarder.ai Pricing
Cost and subscription
Storyboarder.ai offers different pricing tiers based on features and functionality. The current plans include:
- Free plan: Offers basic functionality to help new users get acquainted with the tool.
- Subscription Plan: Provides access to premium features and cloud support.
For the latest pricing details and subscription options, please visit the official Storyboarder.AI website. [website]
Evaluating Storyboarder.ai: Weighing the Pros and Cons
Pros
AI-powered image generation dramatically speeds up the storyboarding process.
The Image-to-Image feature allows seamless blending of external visuals with AI-generated content.
Customizable styles and filters let you create storyboards in various artistic styles.
Shotlist management tools help effectively organize and manage shot details.
Collaboration tools facilitate teamwork and keep everyone aligned on the visual narrative.
Cons
AI-generated images may sometimes need manual tweaking to match a specific creative vision.
Reliance on AI might limit creative input for users who prefer traditional, hands-on methods.
Advanced features often require a paid subscription, which can restrict access for free users.
The quality of AI output depends on the accuracy of your scene descriptions and style choices.
Users unfamiliar with AI tools might face a learning curve.
Key Features of Storyboarder.ai
Extensive Functionality Set
Storyboarder.ai comes packed with features designed to streamline and enhance storyboard creation:
- AI-Powered Image Generation: Automatically create storyboard images from scene descriptions.
- Image Upload & Transformation: Easily upload external images and blend them with the AI's style.
- Shotlist Management: Organize and manage details like scene descriptions, equipment, and shot types.
- Export Options: Export your storyboards in multiple formats, including PDF, JPG, and video.
- Collaboration Tools: Share and collaborate on storyboards with team members in real-time.
- Customizable Styles: Tailor the visual style of your storyboard using different artistic filters and effects.
Versatile Use Cases for Storyboarder.ai
Broad applications across industries
Storyboarder.ai is used across various industries to visualize and plan visual content:
- Film & Television: Pre-visualize scenes, plan camera angles, and storyboard entire productions.
- Advertising: Create storyboards for commercials, marketing videos, and advertising campaigns.
- Animation: Plan animation sequences, character movements, and scene layouts.
- Game Development: Visualize game cinematics, cutscenes, and in-game events.
- Education: Teach visual storytelling, film production, and animation techniques.
By utilizing Storyboarder.ai, professionals and creatives can effectively communicate their ideas, streamline production, and bring their visions to life with clarity.
Frequently Asked Questions
What file formats does Storyboarder.ai support for image uploads?
Storyboarder.ai supports various image formats, including JPEG, PNG, and GIF, ensuring compatibility with most common image files.
How can I ensure that the uploaded image maintains its original aspect ratio?
To avoid stretching or distortion, ensure your uploaded image's aspect ratio matches that of the storyboard frame. You may need to crop or resize your image beforehand.
Can I use Image-to-Image to add specific textures or patterns to my storyboard?
Yes, the Image-to-Image function is ideal for incorporating unique textures or patterns. Use a higher 'Image Strength' setting to retain more detail from your uploaded texture image.
What is the best way to achieve stylistic consistency when using Image-to-Image?
For a consistent style, use a lower 'Image Strength' setting. This emphasizes the AI's stylistic interpretation and blends your uploaded image smoothly with the storyboard's overall aesthetic.
Is it possible to revert back to the original AI-generated image after uploading an image?
Yes, Storyboarder.ai typically allows you to revert to the original AI-generated image. Look for a 'Revert' or 'Refresh' option in the frame's editing menu.
Can I adjust the image strength after uploading the image?
Yes, you can adjust the image strength. This feature allows for iterative refinements, but it only applies to images uploaded using the "Image-to-Image" function.
Related Questions
How does Storyboarder.ai compare to other storyboarding tools?
Storyboarder.ai distinguishes itself with AI-powered image generation and transformation, offering a unique combination of automation and creative freedom. Compared to traditional tools, it makes storyboarding faster and more efficient. It’s an all-in-one editor and creation tool, reducing the need for other software. Its powerful AI can generate countless outcomes based on your input, and its export features make sharing projects straightforward.
Can Storyboarder.ai generate storyboards in different artistic styles?
Yes, Storyboarder.ai provides customizable styles and filters, enabling you to create storyboards in a variety of artistic looks, from simple sketches to cinematic frames. This flexibility improves visual appeal and ensures the storyboard matches your project's aesthetic.
What are the benefits of using AI in storyboarding?
Using AI for storyboarding offers several key advantages: Speed: AI automates the creation of images, saving significant time. Inspiration: AI can produce unique visuals that spark new creative directions. Consistency: AI helps maintain a uniform style across all storyboard frames. Accessibility: AI makes storyboarding achievable for users with varying levels of artistic skill.
How can I collaborate with team members on storyboards created with Storyboarder.ai?
Storyboarder.ai includes collaboration tools that let team members share and work on storyboards together in real-time. This promotes teamwork and ensures everyone has a shared understanding of the visual story.








 Swedish AI Startup Lovable Eyes $13.2 Billion Valuation After Major Funding Round
As AI-driven coding tools gain traction, Swedish startup Lovable has secured a major funding round. The company aims to raise $3 billion, potentially boosting its valuation to $13.2 billion—double the $6.6 billion recorded last December. Menlo Ventur
Google Tests Remy AI Agent for Gemini as Focus Shifts to User Control
According to Business Insider, Google is testing Remy, a new AI personal agent for Gemini. This tool aims to execute tasks on behalf of users, streamlining both professional workflows and daily routines.Currently, Remy is undergoing testing in an int
Swedish AI Startup Lovable Eyes $13.2 Billion Valuation After Major Funding Round
As AI-driven coding tools gain traction, Swedish startup Lovable has secured a major funding round. The company aims to raise $3 billion, potentially boosting its valuation to $13.2 billion—double the $6.6 billion recorded last December. Menlo Ventur
Google Tests Remy AI Agent for Gemini as Focus Shifts to User Control
According to Business Insider, Google is testing Remy, a new AI personal agent for Gemini. This tool aims to execute tasks on behalf of users, streamlining both professional workflows and daily routines.Currently, Remy is undergoing testing in an int
 How to fix Core Web Vitals for better SEO rankings
Streamline Report Card Comments with AI ToolsIntroductionAI Tools for Generating Report Card CommentsMagic SchoolAlmanac AIChat GPTUsing Magic School to Generate Report Card CommentsLogging into Magic SchoolSelecting the Report Card Comments ToolCust
How to fix Core Web Vitals for better SEO rankings
Streamline Report Card Comments with AI ToolsIntroductionAI Tools for Generating Report Card CommentsMagic SchoolAlmanac AIChat GPTUsing Magic School to Generate Report Card CommentsLogging into Magic SchoolSelecting the Report Card Comments ToolCust
2026 Latest Best Top-Rated AI Outline Generators for Long-Form SEO Articles, meticulously curated by XIX.AI. These powerful tools offer game-changing assistance in creating high-quality content quickly, boosting writing efficiency significantly. Get a free vs paid comparison along with real-world tests and detailed rankings to help you find the must-try option that suits your needs. Explore now to unlock your AI edge.
8 tools
xix.ai

2026 Latest Best AI Study Tools for Homework and Exam Prep! XIX.AI curates a top-rated list of powerful, game-changing tools that help students boost productivity, streamline homework completion, and ace exams through real-world tests. Get a free vs paid comparison, detailed rankings, and must-try options to unlock your AI edge. Explore now!
10 tools
xix.ai
2026 Latest Best AI Vocal Demo Tools for Songwriters, Hook Creators, and Multi-Language Content Teams! XIX.AI has curated a top-rated list of powerful game-changing tools that go through rigorous real-world tests. You’ll find detailed free vs paid comparison data, comprehensive rankings, and must-try options to help you boost writing efficiency and unlock your creative potential. Explore now to discover your perfect tool for all your content needs!
9 tools
xix.ai

2026 Latest Best Top-rated AI Competitive Research Tools for Small Businesses! XIX.AI has curated a highly powerful game-changing collection, updated weekly with rigorous real-world tests and detailed rankings. You can find a comprehensive free vs paid comparison to help you identify the must-try tools that boost your productivity and give you a competitive edge. Explore now to discover your perfect tool!
9 tools
xix.ai

2026 Latest Best Photoshop AI retouch tools for ecommerce apparel, skin cleanup, and color consistency! This top-rated curated list features powerful game-changing solutions that help you boost writing efficiency, streamline content creation, and achieve perfect visual results effortlessly. Each tool has undergone real-world tests through weekly updated rankings, complete with free vs paid comparison details. Backed by XIX.AI, it’s the must-try guide for anyone aiming to unlock your AI edge. Explore now!
10 tools
xix.ai
2026 Latest Best Top-Rated AI Prompt Libraries for optimizing all types of ChatGPT workflows. XIX.AI has curated a powerful, game-changing collection that goes through rigorous real-world tests to ensure top performance. You can find detailed free vs paid comparisons and expert rankings to help you choose the must-try tools that boost your productivity and unlock your AI edge. Explore now!
11 tools
xix.ai

Ich frage mich, ob solche KI-Tools bald die Arbeit von Storyboard-Künstlern ersetzen werden? 🤔 Einerseits praktisch, andererseits etwas beängstigend... Aber die Tutorials scheinen gut erklärt!
このチュートリアル、すごく役に立ちそう!外部画像を取り込んでストーリーボードをブラッシュアップできる機能は、アイデアの具体化にぴったりだね。AIツールがここまでクリエイティブな作業をサポートしてくれる時代になったのか…少し驚き。でも、生成された画像の著作権問題はどうなるんだろう?そこがちょっと気になるかも😅
このツール、外部画像の取り込みができるのがすごく便利だね!ストーリーボードの調整がこんなに柔軟にできるなら、アイデアの具現化が格段に楽になりそう。ただ、無料版だとどのくらい使えるのかな?🤔 料金プランが気になる…