Home
HomeMeshy AI Enables Seamless Image-to-3D Model Conversion
In the modern digital world, 3D modeling is growing in significance across many fields, from video games and animation to product design and additive manufacturing. Meshy AI stands out as a robust platform that streamlines the generation of 3D assets from simple images and text descriptions. This guide details how to use Meshy AI to convert images into intricate 3D models, prepare them for 3D printing, and reviews the platform's core capabilities.
Key Points
Meshy AI enables the creation of 3D models from both text inputs and images.
A free trial with limited credits is available to test the platform's features.
For optimal outcomes, use images that are front-facing and direct.
Exporting models in .blend format preserves textures for editing in Blender.
Applying modifiers in Blender can significantly improve model detail.
Slicing the model creates a flat base, which is essential for successful 3D printing.
Getting Started with Meshy AI
Exploring the Free Trial and Account Setup
Your first step with Meshy AI is to create an account and explore the features available during the free trial period. This trial grants a set number of credits to experiment with core functionalities like text-to-3D and image-to-3D generation.

To demonstrate the new user experience, it can be helpful to use a separate account. While testing, review the different subscription plans to compare credit allowances, processing priority, and available tools.
Note: Always review the free trial's terms to understand its limits and duration. Following the recommended input guidelines is also crucial for maximizing the platform's effectiveness and the quality of your final print.
Navigating the Meshy AI Interface: Text to 3D
Meshy AI includes a 'Text to 3D' feature that generates 3D models from descriptive prompts.

Simply type a description of your desired object, and the AI will produce a corresponding 3D model. The accuracy and detail of the result largely depend on how clear and specific your prompt is. Experimenting with different prompts is recommended to achieve the best outcome.
For effective use of the Text to 3D feature, keep these tips in mind:
- Write Clear, Specific Prompts: Provide detailed descriptions of the object.
- Experiment with Artistic Styles: Try prompts that include styles like "realistic" or "sculptural" to vary the output.
- Specify "Hard Surface": If you need a mechanical or rigid object, include "hard surface" in your prompt.
Converting Images to 3D Models: Image to 3D
The 'Image to 3D' tool is a fundamental part of Meshy AI, allowing you to upload a 2D image for conversion into a 3D model.
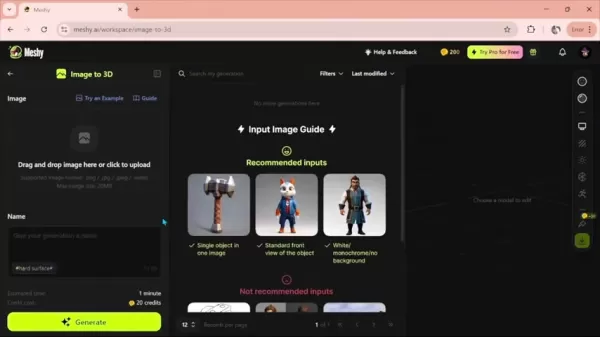
For the most accurate conversion, use a straight-on, front-facing image. Angled shots can work but may reduce precision. Click the upload area, select your image, assign a name to your project, and initiate the generation process.
To improve your results with Image to 3D conversion, follow these guidelines:
- Use High-Quality Images: Higher resolution source images generally produce better models.
- Ensure Good Lighting: Well-lit photographs help create clearer 3D geometry.
- Choose Front-Facing Angles: Direct, head-on images yield the most reliable conversions.
Preparing the Model for 3D Printing
Using Slicing Software
Slicing software translates your 3D model into printable layers that your 3D printer can understand.
Follow this process to prepare your model for printing:
- Import the STL File: Open your preferred slicer (e.g., Cura, Simplify3D, Bambu Studio) and import the STL file exported from Blender.
- Adjust Model Orientation: Position the model to minimize support structures. Ideally, place the flattest surface on the build plate.
- Configure Print Settings: Set parameters like layer height, infill density, print speed, and temperature. Finer details often require lower layer heights (e.g., 0.1mm to 0.2mm).
- Add Supports if Needed: Generate supports only for essential overhangs.
- Slice the Model: Process the model to create the G-code instructions for the printer.
- Save the G-code: Save the file to an SD card or other storage medium for transfer to your printer.
The G-code file is now ready for printing. Note that optimal settings vary by printer and material, so some fine-tuning may be necessary.
3D Printing and Post-Processing
The final stage involves printing the model and performing any required post-processing to finish the piece.
Complete this step as follows:
- Print the Model: Load the G-code and start the print job, monitoring the process for any issues.
- Remove Supports: If used, carefully remove support material to avoid damaging the model.
- Post-Process the Print: This can include sanding, filling gaps, and painting to achieve a smooth, finished appearance.
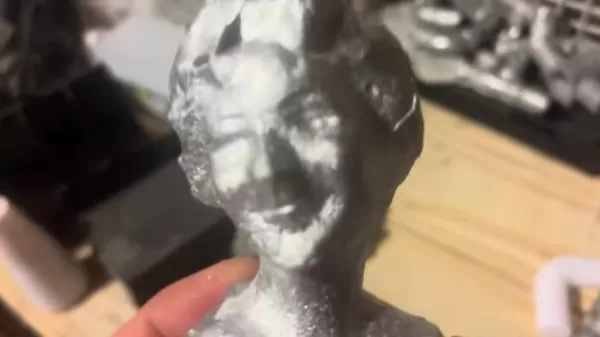
While the example model shows some seam lines from the mold, these can be cleaned up during post-processing. With some effort, you'll have a completed 3D printed model.
Optimizing and Refining 3D Models in Blender
Exporting Models from Meshy AI
Meshy AI offers multiple export formats. To preserve the textures created by the AI, export your model in .blend format, which is native to the free 3D software Blender.
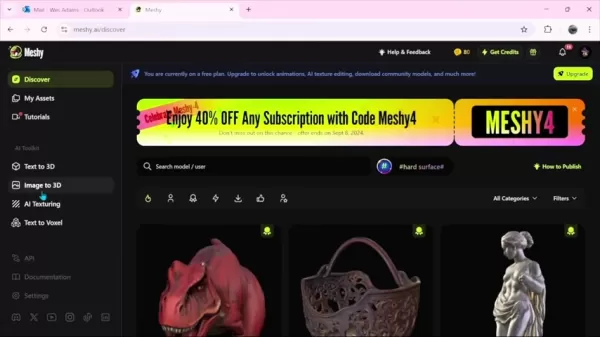
Formats like STL typically export only the geometry without textures, which limits visual detail.
Choosing the .blend format ensures that intricate details such as eyebrows and eyes are retained, resulting in a more complete and visually appealing model.
Importing and Modifying the 3D Model in Blender
Blender is a powerful, free tool for refining 3D models. After exporting your model from Meshy AI as a .blend file, import it into Blender.
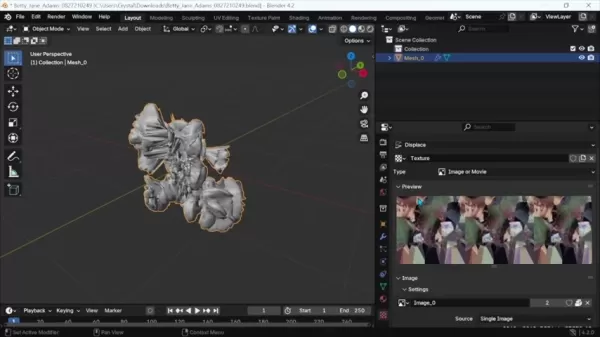
The goal is to enhance the model's details and prepare it for 3D printing.
Follow these steps to refine your model:
- Open Blender: Launch the Blender application.
- Open the .blend File: Go to 'File' > 'Open' and select your exported .blend file.
- Add Modifiers:
- Click the wrench icon in the lower-right properties panel to access the Modifiers tab.
- Add a 'Subdivision Surface' modifier to smooth the mesh.
- Add a 'Displace' modifier to enhance finer surface details.
- Adjust Settings:
- Under the Displace modifier, click 'New' for the texture, then select 'Image_0'.
- Experiment with the strength setting (typically between 0.01 and 0.25) to accentuate features. Higher values can make features thinner. Adjust subdivision levels for more detail or smoothing.
- Check Details in the Viewport: Note: Working with high subdivision levels requires capable computer hardware to avoid crashes. Save your work frequently! Zoom in on the model to inspect the enhanced feature detail.
By carefully tuning these settings, you can create a much more refined and detailed 3D model ready for printing.
Exporting the Optimized Model
Once your model is refined in Blender, export it in a format compatible with 3D printing. This usually means saving it as an STL file to preserve all enhancements. Navigate to 'File' > 'Export' > 'STL (.stl)', choose a destination folder, name your file, and click 'Export STL'.
Meshy AI Pricing
Understanding Subscription Plans
Meshy AI offers several subscription tiers designed for different users, from individual creators to professional studios. Each plan includes a specific monthly credit allowance, queue priority, and additional features.
Plan Credits/Month Queue Priority Other Features Pricing (Monthly) Pricing (Yearly) Free 200 Limited CC BY 4.0 License, API Access $0 N/A Pro 1,000 Standard Private Assets, API Access $16 $192 Max 4,000 Maximized 8 Free Retries, Community Model Download $48 $579 Max Unlimited Unlimited Maximized Unlimited Retries, Community Model Download $96 $1,152
Users can select the plan that best matches their usage and budget, with the flexibility to upgrade as their needs change.
Weighing the Pros and Cons of Meshy AI
Pros
Ease of Use: The platform features a straightforward, intuitive interface accessible to users with little 3D modeling experience.
Rapid Prototyping: It quickly generates 3D models from text and images, enabling fast prototyping and idea visualization.
Integration with Blender: Exporting in .blend format allows for seamless further refinement and customization within Blender.
Cost-Effective: A free trial and tiered subscription plans cater to various needs and budgets.
AI-Driven: Leverages artificial intelligence to automate and simplify 3D modeling, lowering the technical barrier to entry.
Cons
Limited Control: Professional 3D artists may find the customization options lacking compared to traditional, manual modeling software.
Dependency on AI Quality: Output quality depends on the AI's interpretation of input, which can sometimes be inaccurate or inconsistent.
Subscription Costs: Higher-tier plans can be costly for casual users or those with limited budgets.
Potential for Over-reliance: Heavy dependence on AI tools might slow the development of core 3D modeling skills.
Hardware Requirements: Intensive refinement in Blender can strain system resources, potentially causing software instability.
Frequently Asked Questions about Meshy AI
What file format should I use to export my models from Meshy AI?
To preserve textures, export your model in .blend format for use in Blender. Formats like STL typically export only the geometry without textures.
How can I enhance the details of my 3D model?
After importing your model into Blender, apply modifiers like Subdivision Surface and Displace. Fine-tune their settings to bring out additional detail in the mesh.
What should I do if I encounter an uneven base on my 3D model for printing?
Use your slicing software to trim or "slice" the bottom of the model, creating a flat, level base optimized for 3D printing. This is often easily done within Bambu Lab's slicer software.
What happens to the texture quality if I only export the STL file?
STL files contain only geometric shape data, not textures or colors. To maintain visual detail, use the .blend export format.
My 3D model looks blob-like after adding the 'Displace' modifier, what should I do?
Reduce the strength setting in the Displace modifier. Lower values will add structure and detail without overly distorting the model's form.
Related Questions
How does Meshy AI compare to other 3D modeling software?
Meshy AI differentiates itself through user-friendliness and AI-powered generation from text and images. Traditional 3D software often demands significant expertise, while Meshy AI provides a more accessible starting point for creating basic models quickly. These models can then be refined in advanced software like Blender. However, professional artists may find its control and customization options less comprehensive than dedicated modeling applications.
Can I use Meshy AI for commercial purposes?
Commercial usage rights depend on your subscription plan. The free plan offers 200 credits for testing, but models are under a CC BY 4.0 license and are not for commercial use. Paid plans (Pro, Max, Max Unlimited) typically grant commercial rights. Always review your plan's specific terms of service for confirmation. Also, note that Bambu Lab holds copyright over generated models, and monetization is generally only permitted with an active paid subscription.
What are the best practices for creating text prompts in Meshy AI?
For effective text prompts in Meshy AI, prioritize clarity and specificity. Describe the object's shape, size, material, color, and style in detail. Including terms like "hard surface" can guide the AI toward more mechanical results. Experiment with different phrasings and keywords. Start with a simple prompt and gradually add descriptive elements to iteratively improve the generated model.
Related article
 Swedish AI Startup Lovable Eyes $13.2 Billion Valuation After Major Funding Round
As AI-driven coding tools gain traction, Swedish startup Lovable has secured a major funding round. The company aims to raise $3 billion, potentially boosting its valuation to $13.2 billion—double the $6.6 billion recorded last December. Menlo Ventur
Google Tests Remy AI Agent for Gemini as Focus Shifts to User Control
According to Business Insider, Google is testing Remy, a new AI personal agent for Gemini. This tool aims to execute tasks on behalf of users, streamlining both professional workflows and daily routines.Currently, Remy is undergoing testing in an int
How to fix Core Web Vitals for better SEO rankings
Streamline Report Card Comments with AI ToolsIntroductionAI Tools for Generating Report Card CommentsMagic SchoolAlmanac AIChat GPTUsing Magic School to Generate Report Card CommentsLogging into Magic SchoolSelecting the Report Card Comments ToolCust
Related Special Topic Recommendations
writing
Swedish AI Startup Lovable Eyes $13.2 Billion Valuation After Major Funding Round
As AI-driven coding tools gain traction, Swedish startup Lovable has secured a major funding round. The company aims to raise $3 billion, potentially boosting its valuation to $13.2 billion—double the $6.6 billion recorded last December. Menlo Ventur
Google Tests Remy AI Agent for Gemini as Focus Shifts to User Control
According to Business Insider, Google is testing Remy, a new AI personal agent for Gemini. This tool aims to execute tasks on behalf of users, streamlining both professional workflows and daily routines.Currently, Remy is undergoing testing in an int
How to fix Core Web Vitals for better SEO rankings
Streamline Report Card Comments with AI ToolsIntroductionAI Tools for Generating Report Card CommentsMagic SchoolAlmanac AIChat GPTUsing Magic School to Generate Report Card CommentsLogging into Magic SchoolSelecting the Report Card Comments ToolCust
Related Special Topic Recommendations
writing
 Best AI Outline Generators for Long-Form SEO Articles
2026 Latest Best Top-Rated AI Outline Generators for Long-Form SEO Articles, meticulously curated by XIX.AI. These powerful tools offer game-changing assistance in creating high-quality content quickly, boosting writing efficiency significantly. Get a free vs paid comparison along with real-world tests and detailed rankings to help you find the must-try option that suits your needs. Explore now to unlock your AI edge.
 8 tools
 xix.ai
Education and Learning
AI Study Tools for Homework and Exam Prep
xix.ai
Education and Learning
AI Study Tools for Homework and Exam Prep
2026 Latest Best AI Study Tools for Homework and Exam Prep! XIX.AI curates a top-rated list of powerful, game-changing tools that help students boost productivity, streamline homework completion, and ace exams through real-world tests. Get a free vs paid comparison, detailed rankings, and must-try options to unlock your AI edge. Explore now!
10 tools
xix.ai
Music composition
AI Vocal Demo Tools for Songwriters, Hooks, Toplines, and Multilingual Draft Sessions
2026 Latest Best AI Vocal Demo Tools for Songwriters, Hook Creators, and Multi-Language Content Teams! XIX.AI has curated a top-rated list of powerful game-changing tools that go through rigorous real-world tests. You’ll find detailed free vs paid comparison data, comprehensive rankings, and must-try options to help you boost writing efficiency and unlock your creative potential. Explore now to discover your perfect tool for all your content needs!
9 tools
xix.ai
Business
Best AI Competitive Research Tools for Small Businesses
2026 Latest Best Top-rated AI Competitive Research Tools for Small Businesses! XIX.AI has curated a highly powerful game-changing collection, updated weekly with rigorous real-world tests and detailed rankings. You can find a comprehensive free vs paid comparison to help you identify the must-try tools that boost your productivity and give you a competitive edge. Explore now to discover your perfect tool!
9 tools
xix.ai
Image editing
Photoshop AI Retouch Tools for Ecommerce Apparel, Skin Cleanup, and Color Consistency
2026 Latest Best Photoshop AI retouch tools for ecommerce apparel, skin cleanup, and color consistency! This top-rated curated list features powerful game-changing solutions that help you boost writing efficiency, streamline content creation, and achieve perfect visual results effortlessly. Each tool has undergone real-world tests through weekly updated rankings, complete with free vs paid comparison details. Backed by XIX.AI, it’s the must-try guide for anyone aiming to unlock your AI edge. Explore now!
10 tools
xix.ai
Prompt
Best AI Prompt Libraries for ChatGPT Workflows
2026 Latest Best Top-Rated AI Prompt Libraries for optimizing all types of ChatGPT workflows. XIX.AI has curated a powerful, game-changing collection that goes through rigorous real-world tests to ensure top performance. You can find detailed free vs paid comparisons and expert rankings to help you choose the must-try tools that boost your productivity and unlock your AI edge. Explore now!
11 tools
xix.ai

 Comments (1)
0/500
Comments (1)
0/500
![DonaldLee]()
Okay, I've been burned by 'AI' tools before, but this image-to-3D thing actually looks promising. The demo videos show some impressive detail. My only worry is whether it can handle complex organic shapes without turning them into nightmares. Still, for rapid prototyping, this could be a game-changer. 🤔
In the modern digital world, 3D modeling is growing in significance across many fields, from video games and animation to product design and additive manufacturing. Meshy AI stands out as a robust platform that streamlines the generation of 3D assets from simple images and text descriptions. This guide details how to use Meshy AI to convert images into intricate 3D models, prepare them for 3D printing, and reviews the platform's core capabilities.
Key Points
Meshy AI enables the creation of 3D models from both text inputs and images.
A free trial with limited credits is available to test the platform's features.
For optimal outcomes, use images that are front-facing and direct.
Exporting models in .blend format preserves textures for editing in Blender.
Applying modifiers in Blender can significantly improve model detail.
Slicing the model creates a flat base, which is essential for successful 3D printing.
Getting Started with Meshy AI
Exploring the Free Trial and Account Setup
Your first step with Meshy AI is to create an account and explore the features available during the free trial period. This trial grants a set number of credits to experiment with core functionalities like text-to-3D and image-to-3D generation.
To demonstrate the new user experience, it can be helpful to use a separate account. While testing, review the different subscription plans to compare credit allowances, processing priority, and available tools.
Note: Always review the free trial's terms to understand its limits and duration. Following the recommended input guidelines is also crucial for maximizing the platform's effectiveness and the quality of your final print.
Navigating the Meshy AI Interface: Text to 3D
Meshy AI includes a 'Text to 3D' feature that generates 3D models from descriptive prompts.
Simply type a description of your desired object, and the AI will produce a corresponding 3D model. The accuracy and detail of the result largely depend on how clear and specific your prompt is. Experimenting with different prompts is recommended to achieve the best outcome.
For effective use of the Text to 3D feature, keep these tips in mind:
- Write Clear, Specific Prompts: Provide detailed descriptions of the object.
- Experiment with Artistic Styles: Try prompts that include styles like "realistic" or "sculptural" to vary the output.
- Specify "Hard Surface": If you need a mechanical or rigid object, include "hard surface" in your prompt.
Converting Images to 3D Models: Image to 3D
The 'Image to 3D' tool is a fundamental part of Meshy AI, allowing you to upload a 2D image for conversion into a 3D model.
For the most accurate conversion, use a straight-on, front-facing image. Angled shots can work but may reduce precision. Click the upload area, select your image, assign a name to your project, and initiate the generation process.
To improve your results with Image to 3D conversion, follow these guidelines:
- Use High-Quality Images: Higher resolution source images generally produce better models.
- Ensure Good Lighting: Well-lit photographs help create clearer 3D geometry.
- Choose Front-Facing Angles: Direct, head-on images yield the most reliable conversions.
Preparing the Model for 3D Printing
Using Slicing Software
Slicing software translates your 3D model into printable layers that your 3D printer can understand.
Follow this process to prepare your model for printing:
- Import the STL File: Open your preferred slicer (e.g., Cura, Simplify3D, Bambu Studio) and import the STL file exported from Blender.
- Adjust Model Orientation: Position the model to minimize support structures. Ideally, place the flattest surface on the build plate.
- Configure Print Settings: Set parameters like layer height, infill density, print speed, and temperature. Finer details often require lower layer heights (e.g., 0.1mm to 0.2mm).
- Add Supports if Needed: Generate supports only for essential overhangs.
- Slice the Model: Process the model to create the G-code instructions for the printer.
- Save the G-code: Save the file to an SD card or other storage medium for transfer to your printer.
The G-code file is now ready for printing. Note that optimal settings vary by printer and material, so some fine-tuning may be necessary.
3D Printing and Post-Processing
The final stage involves printing the model and performing any required post-processing to finish the piece.
Complete this step as follows:
- Print the Model: Load the G-code and start the print job, monitoring the process for any issues.
- Remove Supports: If used, carefully remove support material to avoid damaging the model.
- Post-Process the Print: This can include sanding, filling gaps, and painting to achieve a smooth, finished appearance.
While the example model shows some seam lines from the mold, these can be cleaned up during post-processing. With some effort, you'll have a completed 3D printed model.
Optimizing and Refining 3D Models in Blender
Exporting Models from Meshy AI
Meshy AI offers multiple export formats. To preserve the textures created by the AI, export your model in .blend format, which is native to the free 3D software Blender.
Formats like STL typically export only the geometry without textures, which limits visual detail.
Choosing the .blend format ensures that intricate details such as eyebrows and eyes are retained, resulting in a more complete and visually appealing model.
Importing and Modifying the 3D Model in Blender
Blender is a powerful, free tool for refining 3D models. After exporting your model from Meshy AI as a .blend file, import it into Blender.
The goal is to enhance the model's details and prepare it for 3D printing.
Follow these steps to refine your model:
- Open Blender: Launch the Blender application.
- Open the .blend File: Go to 'File' > 'Open' and select your exported .blend file.
- Add Modifiers:
- Click the wrench icon in the lower-right properties panel to access the Modifiers tab.
- Add a 'Subdivision Surface' modifier to smooth the mesh.
- Add a 'Displace' modifier to enhance finer surface details.
- Adjust Settings:
- Under the Displace modifier, click 'New' for the texture, then select 'Image_0'.
- Experiment with the strength setting (typically between 0.01 and 0.25) to accentuate features. Higher values can make features thinner. Adjust subdivision levels for more detail or smoothing.
- Check Details in the Viewport: Note: Working with high subdivision levels requires capable computer hardware to avoid crashes. Save your work frequently! Zoom in on the model to inspect the enhanced feature detail.
By carefully tuning these settings, you can create a much more refined and detailed 3D model ready for printing.
Exporting the Optimized Model
Once your model is refined in Blender, export it in a format compatible with 3D printing. This usually means saving it as an STL file to preserve all enhancements. Navigate to 'File' > 'Export' > 'STL (.stl)', choose a destination folder, name your file, and click 'Export STL'.
Meshy AI Pricing
Understanding Subscription Plans
Meshy AI offers several subscription tiers designed for different users, from individual creators to professional studios. Each plan includes a specific monthly credit allowance, queue priority, and additional features.
| Plan | Credits/Month | Queue Priority | Other Features | Pricing (Monthly) | Pricing (Yearly) |
|---|---|---|---|---|---|
| Free | 200 | Limited | CC BY 4.0 License, API Access | $0 | N/A |
| Pro | 1,000 | Standard | Private Assets, API Access | $16 | $192 |
| Max | 4,000 | Maximized | 8 Free Retries, Community Model Download | $48 | $579 |
| Max Unlimited | Unlimited | Maximized | Unlimited Retries, Community Model Download | $96 | $1,152 |
Users can select the plan that best matches their usage and budget, with the flexibility to upgrade as their needs change.
Weighing the Pros and Cons of Meshy AI
Pros
Ease of Use: The platform features a straightforward, intuitive interface accessible to users with little 3D modeling experience.
Rapid Prototyping: It quickly generates 3D models from text and images, enabling fast prototyping and idea visualization.
Integration with Blender: Exporting in .blend format allows for seamless further refinement and customization within Blender.
Cost-Effective: A free trial and tiered subscription plans cater to various needs and budgets.
AI-Driven: Leverages artificial intelligence to automate and simplify 3D modeling, lowering the technical barrier to entry.
Cons
Limited Control: Professional 3D artists may find the customization options lacking compared to traditional, manual modeling software.
Dependency on AI Quality: Output quality depends on the AI's interpretation of input, which can sometimes be inaccurate or inconsistent.
Subscription Costs: Higher-tier plans can be costly for casual users or those with limited budgets.
Potential for Over-reliance: Heavy dependence on AI tools might slow the development of core 3D modeling skills.
Hardware Requirements: Intensive refinement in Blender can strain system resources, potentially causing software instability.
Frequently Asked Questions about Meshy AI
What file format should I use to export my models from Meshy AI?
To preserve textures, export your model in .blend format for use in Blender. Formats like STL typically export only the geometry without textures.
How can I enhance the details of my 3D model?
After importing your model into Blender, apply modifiers like Subdivision Surface and Displace. Fine-tune their settings to bring out additional detail in the mesh.
What should I do if I encounter an uneven base on my 3D model for printing?
Use your slicing software to trim or "slice" the bottom of the model, creating a flat, level base optimized for 3D printing. This is often easily done within Bambu Lab's slicer software.
What happens to the texture quality if I only export the STL file?
STL files contain only geometric shape data, not textures or colors. To maintain visual detail, use the .blend export format.
My 3D model looks blob-like after adding the 'Displace' modifier, what should I do?
Reduce the strength setting in the Displace modifier. Lower values will add structure and detail without overly distorting the model's form.
Related Questions
How does Meshy AI compare to other 3D modeling software?
Meshy AI differentiates itself through user-friendliness and AI-powered generation from text and images. Traditional 3D software often demands significant expertise, while Meshy AI provides a more accessible starting point for creating basic models quickly. These models can then be refined in advanced software like Blender. However, professional artists may find its control and customization options less comprehensive than dedicated modeling applications.
Can I use Meshy AI for commercial purposes?
Commercial usage rights depend on your subscription plan. The free plan offers 200 credits for testing, but models are under a CC BY 4.0 license and are not for commercial use. Paid plans (Pro, Max, Max Unlimited) typically grant commercial rights. Always review your plan's specific terms of service for confirmation. Also, note that Bambu Lab holds copyright over generated models, and monetization is generally only permitted with an active paid subscription.
What are the best practices for creating text prompts in Meshy AI?
For effective text prompts in Meshy AI, prioritize clarity and specificity. Describe the object's shape, size, material, color, and style in detail. Including terms like "hard surface" can guide the AI toward more mechanical results. Experiment with different phrasings and keywords. Start with a simple prompt and gradually add descriptive elements to iteratively improve the generated model.








 Swedish AI Startup Lovable Eyes $13.2 Billion Valuation After Major Funding Round
As AI-driven coding tools gain traction, Swedish startup Lovable has secured a major funding round. The company aims to raise $3 billion, potentially boosting its valuation to $13.2 billion—double the $6.6 billion recorded last December. Menlo Ventur
Google Tests Remy AI Agent for Gemini as Focus Shifts to User Control
According to Business Insider, Google is testing Remy, a new AI personal agent for Gemini. This tool aims to execute tasks on behalf of users, streamlining both professional workflows and daily routines.Currently, Remy is undergoing testing in an int
Swedish AI Startup Lovable Eyes $13.2 Billion Valuation After Major Funding Round
As AI-driven coding tools gain traction, Swedish startup Lovable has secured a major funding round. The company aims to raise $3 billion, potentially boosting its valuation to $13.2 billion—double the $6.6 billion recorded last December. Menlo Ventur
Google Tests Remy AI Agent for Gemini as Focus Shifts to User Control
According to Business Insider, Google is testing Remy, a new AI personal agent for Gemini. This tool aims to execute tasks on behalf of users, streamlining both professional workflows and daily routines.Currently, Remy is undergoing testing in an int
 How to fix Core Web Vitals for better SEO rankings
Streamline Report Card Comments with AI ToolsIntroductionAI Tools for Generating Report Card CommentsMagic SchoolAlmanac AIChat GPTUsing Magic School to Generate Report Card CommentsLogging into Magic SchoolSelecting the Report Card Comments ToolCust
How to fix Core Web Vitals for better SEO rankings
Streamline Report Card Comments with AI ToolsIntroductionAI Tools for Generating Report Card CommentsMagic SchoolAlmanac AIChat GPTUsing Magic School to Generate Report Card CommentsLogging into Magic SchoolSelecting the Report Card Comments ToolCust

2026 Latest Best Top-Rated AI Outline Generators for Long-Form SEO Articles, meticulously curated by XIX.AI. These powerful tools offer game-changing assistance in creating high-quality content quickly, boosting writing efficiency significantly. Get a free vs paid comparison along with real-world tests and detailed rankings to help you find the must-try option that suits your needs. Explore now to unlock your AI edge.
8 tools
xix.ai

2026 Latest Best AI Study Tools for Homework and Exam Prep! XIX.AI curates a top-rated list of powerful, game-changing tools that help students boost productivity, streamline homework completion, and ace exams through real-world tests. Get a free vs paid comparison, detailed rankings, and must-try options to unlock your AI edge. Explore now!
10 tools
xix.ai

2026 Latest Best AI Vocal Demo Tools for Songwriters, Hook Creators, and Multi-Language Content Teams! XIX.AI has curated a top-rated list of powerful game-changing tools that go through rigorous real-world tests. You’ll find detailed free vs paid comparison data, comprehensive rankings, and must-try options to help you boost writing efficiency and unlock your creative potential. Explore now to discover your perfect tool for all your content needs!
9 tools
xix.ai

2026 Latest Best Top-rated AI Competitive Research Tools for Small Businesses! XIX.AI has curated a highly powerful game-changing collection, updated weekly with rigorous real-world tests and detailed rankings. You can find a comprehensive free vs paid comparison to help you identify the must-try tools that boost your productivity and give you a competitive edge. Explore now to discover your perfect tool!
9 tools
xix.ai

2026 Latest Best Photoshop AI retouch tools for ecommerce apparel, skin cleanup, and color consistency! This top-rated curated list features powerful game-changing solutions that help you boost writing efficiency, streamline content creation, and achieve perfect visual results effortlessly. Each tool has undergone real-world tests through weekly updated rankings, complete with free vs paid comparison details. Backed by XIX.AI, it’s the must-try guide for anyone aiming to unlock your AI edge. Explore now!
10 tools
xix.ai

2026 Latest Best Top-Rated AI Prompt Libraries for optimizing all types of ChatGPT workflows. XIX.AI has curated a powerful, game-changing collection that goes through rigorous real-world tests to ensure top performance. You can find detailed free vs paid comparisons and expert rankings to help you choose the must-try tools that boost your productivity and unlock your AI edge. Explore now!
11 tools
xix.ai

Okay, I've been burned by 'AI' tools before, but this image-to-3D thing actually looks promising. The demo videos show some impressive detail. My only worry is whether it can handle complex organic shapes without turning them into nightmares. Still, for rapid prototyping, this could be a game-changer. 🤔