Home
HomeLearn to fold the Bosklapper paper airplane with this step-by-step guide.
Discover your potential as a paper airplane engineer with the Bosklapper! This design, perfected by Jeff Powells, boasts remarkable gliding distance and a unique boomerang flight path. This in-depth tutorial will guide you through every fold, turning a basic sheet of paper into a high-performance flyer. Ideal for newcomers and experienced folders alike, get ready to be impressed by the Bosklapper's aerodynamic excellence. Prepare to rule the skies with your paper creation!
Key Points
The Bosklapper is a paper airplane model created by designer Jeff Powells.
It is an enhanced version featuring superior aerodynamics and a 3D locking system.
This versatile design performs as both a long-distance glider and a returning boomerang.
Its construction difficulty is rated as intermediate.
All you need is a single sheet of A4 or 8.5 x 11 inch paper.
Understanding the Bosklapper Paper Airplane
What is the Bosklapper?
The Bosklapper stands out from typical paper airplanes. Created by Jeff Powells, a champion in paper airplane competitions, it showcases clever aerodynamic design. Its uniqueness lies not only in its smooth, extended glide but also in its ability to circle back like a boomerang, offering twice the entertainment. Renowned for its creative structure and impressive flight performance, it's a popular choice among folding enthusiasts. A key feature is its 3D locking mechanism, which adds crucial in-flight stability. This distinctive element also allows for advanced aerodynamic shaping on the plane's underside, contributing to greater speed and range.
The updated Bosklapper design marks a major improvement on an already excellent foundation. After his contest win, Jeff Powells continued to refine the model, culminating in a final version with better aerodynamic efficiency and an innovative 3D lock that boosts structural strength and stability. Let's learn how to build this impressive aircraft.
Materials and Difficulty
Before starting the folding process, assemble your materials. You only need one sheet of paper, either A4 or standard 8.5 x 11 inch letter size.
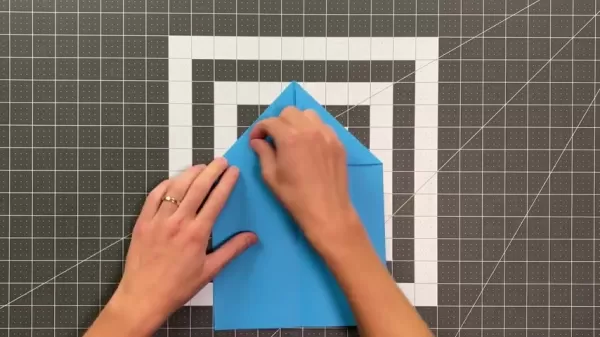
The video tutorial uses blue paper, which is optional, but using the same color will make your plane match the demonstration.
In terms of difficulty, the Bosklapper is an intermediate-level project. Some folds demand accuracy, but the clear, step-by-step video instructions will lead you through successfully, even if you are fairly new to paper folding. Be patient, work carefully, and enjoy learning the craft!
Step-by-Step Instructions: Folding the Bosklapper
Step 1: The Initial Fold
Start by folding the paper in half lengthwise, carefully matching one long edge to the opposite edge.
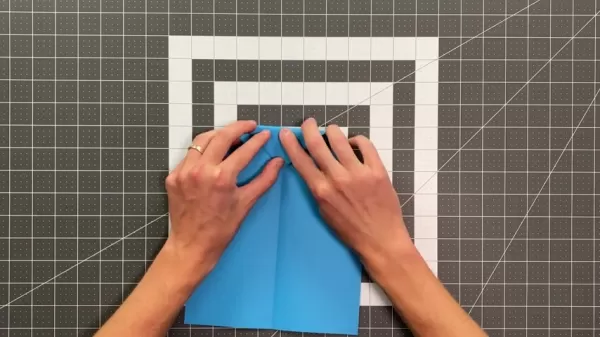
Make sure the edges align perfectly. Press firmly to create a sharp crease. This forms the central reference line for the airplane. Unfold the paper back to a rectangle, leaving a clear center crease needed for the next step.
This initial guideline is fundamental for ensuring the symmetry and balance of all subsequent folds.
Step 2: Creating the Leading Edges
Now, fold the top two corners down toward the center crease. Crucially, leave a tiny gap of about 1mm between the folded edge and the center line. This slight adjustment improves the wing's aerodynamic shape. Repeat on the other side, checking that both folds are symmetrical and the small gap is consistent. This step forms the leading edges of the wings, which are vital for lift and glide.
Step 3: Folding the Nose
Next, fold the top point of the triangle you just created down to the center line, but only make a light pinch crease. A full, hard crease is not needed here.
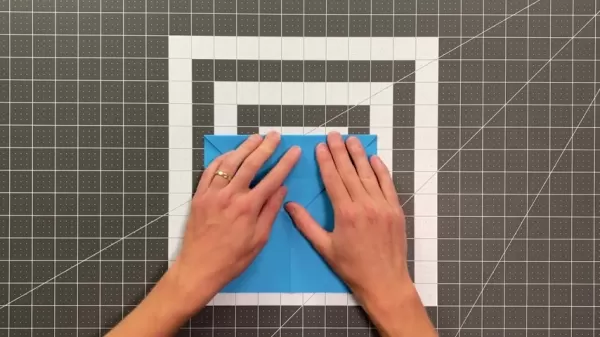
Then, fold the top point down again, this time to meet the pinch crease you just made. For this fold, create a firm, full crease to continue building the plane's structure.
Step 4: Inverting the Top Fold
Turn the paper over. With the folded side facing down, fold the top edge downward just until the triangular flaps from the first step become visible—about 1mm over. You can unfold and reinforce this crease if needed. Next, perform a mountain fold to tuck those triangular flaps inside. Now, fold this inner edge so it aligns perfectly with the outer edge.
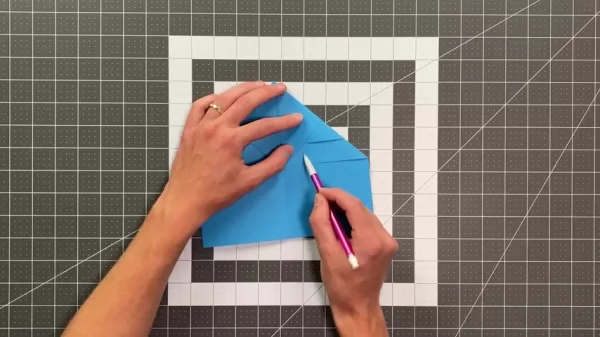
Check that this edge runs parallel to the outer edge, ensuring a clean, squared-off fold.
Step 5: Prepare for Squash Fold
For symmetry, unfold your paper and repeat the previous step's folds on the opposite side. Then, unfold that side, flip the paper over, and fold down along the existing crease you just made.
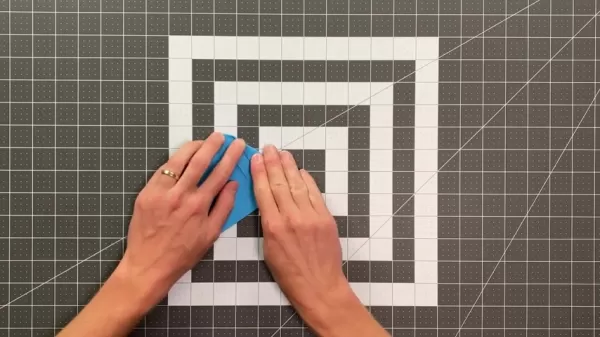
Once complete, perform a squash fold to flatten the section, preparing the paper for the wing folds.
Step 6: Wing Formation
Now, shape the wings. After completing the squash fold on the other side, the wing design should be more apparent. Simply fold the paper along the natural lines to form the wing, making sure it aligns neatly with the body of the plane.
Step 7: Locking It All Together
To finalize the plane, you need to lock everything in place. Rotate it to the side, and then tuck the tab back in between the layers of the wings.
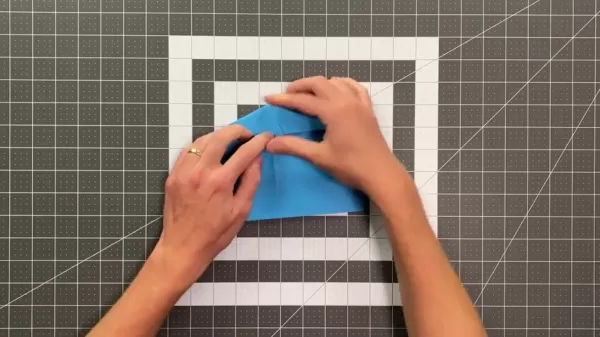
Your plane will need some upward elevator (a slight upward bend at the back of the wings). As an optional reinforcement, you can apply a small piece of tape to prevent the folds from coming loose during flight.
Pros and Cons of the Bosklapper Design
Pros
Aerodynamic design for long glide times
Capable of boomerang-style returns
Innovative 3D locking mechanism for stability
Assembly becomes straightforward after the initial complex steps.
Cons
The number of steps can be challenging to follow
Precise folding is required for best results
Like all paper planes, it is susceptible to wind
Mastering both glide and boomerang throws requires practice
Frequently Asked Questions (FAQ)
What makes the Bosklapper different from other paper airplanes?
The Bosklapper, designed by Jeff Powells, is unique for merging long-glide performance with boomerang-style return flight. Its improved aerodynamic design and 3D locking mechanism provide exceptional stability, setting it apart from simpler models.
Is the Bosklapper suitable for beginners?
The Bosklapper is an intermediate-level design. Beginners can successfully build it with careful attention to the video tutorial, though some folds require patience and a focus on precision.
What type of paper is best for folding the Bosklapper?
Standard A4 or 8.5 x 11 inch printer paper is ideal. For better gliding, you can experiment with slightly lighter-weight paper.
How can I improve the Bosklapper's flight distance?
Ensure your folds are precise and symmetrical. Fine-tuning the wing elevators (the back edges) and practicing a smooth, level throw will significantly optimize its flight distance.
Can the Bosklapper really return like a boomerang?
Yes, with correct adjustments to the elevators and the right throwing technique, the Bosklapper can execute a reliable boomerang return. It may take some experimentation to perfect.
Related Questions
Where can I find more paper airplane designs and tutorials?
Numerous websites and YouTube channels provide extensive libraries of paper airplane designs and tutorials. Search for phrases like 'advanced paper airplanes,' 'origami flight models,' or 'paper plane tutorials' to find abundant resources. Dedicated sites like Foldable Flight are excellent for discovering new designs.
What are some common paper airplane design principles?
Key principles include: symmetrical wings for balanced flight, a correctly positioned center of gravity for stability, smooth surfaces to minimize air resistance, and properly adjusted control surfaces like elevators for steering. Grasping these concepts can help you modify designs or even create your own original paper aircraft.
Related article
 Swedish AI Startup Lovable Eyes $13.2 Billion Valuation After Major Funding Round
As AI-driven coding tools gain traction, Swedish startup Lovable has secured a major funding round. The company aims to raise $3 billion, potentially boosting its valuation to $13.2 billion—double the $6.6 billion recorded last December. Menlo Ventur
Google Tests Remy AI Agent for Gemini as Focus Shifts to User Control
According to Business Insider, Google is testing Remy, a new AI personal agent for Gemini. This tool aims to execute tasks on behalf of users, streamlining both professional workflows and daily routines.Currently, Remy is undergoing testing in an int
How to fix Core Web Vitals for better SEO rankings
Streamline Report Card Comments with AI ToolsIntroductionAI Tools for Generating Report Card CommentsMagic SchoolAlmanac AIChat GPTUsing Magic School to Generate Report Card CommentsLogging into Magic SchoolSelecting the Report Card Comments ToolCust
Related Special Topic Recommendations
writing
Swedish AI Startup Lovable Eyes $13.2 Billion Valuation After Major Funding Round
As AI-driven coding tools gain traction, Swedish startup Lovable has secured a major funding round. The company aims to raise $3 billion, potentially boosting its valuation to $13.2 billion—double the $6.6 billion recorded last December. Menlo Ventur
Google Tests Remy AI Agent for Gemini as Focus Shifts to User Control
According to Business Insider, Google is testing Remy, a new AI personal agent for Gemini. This tool aims to execute tasks on behalf of users, streamlining both professional workflows and daily routines.Currently, Remy is undergoing testing in an int
How to fix Core Web Vitals for better SEO rankings
Streamline Report Card Comments with AI ToolsIntroductionAI Tools for Generating Report Card CommentsMagic SchoolAlmanac AIChat GPTUsing Magic School to Generate Report Card CommentsLogging into Magic SchoolSelecting the Report Card Comments ToolCust
Related Special Topic Recommendations
writing
 Best AI Outline Generators for Long-Form SEO Articles
2026 Latest Best Top-Rated AI Outline Generators for Long-Form SEO Articles, meticulously curated by XIX.AI. These powerful tools offer game-changing assistance in creating high-quality content quickly, boosting writing efficiency significantly. Get a free vs paid comparison along with real-world tests and detailed rankings to help you find the must-try option that suits your needs. Explore now to unlock your AI edge.
 8 tools
 xix.ai
Education and Learning
AI Study Tools for Homework and Exam Prep
xix.ai
Education and Learning
AI Study Tools for Homework and Exam Prep
2026 Latest Best AI Study Tools for Homework and Exam Prep! XIX.AI curates a top-rated list of powerful, game-changing tools that help students boost productivity, streamline homework completion, and ace exams through real-world tests. Get a free vs paid comparison, detailed rankings, and must-try options to unlock your AI edge. Explore now!
10 tools
xix.ai
Music composition
AI Vocal Demo Tools for Songwriters, Hooks, Toplines, and Multilingual Draft Sessions
2026 Latest Best AI Vocal Demo Tools for Songwriters, Hook Creators, and Multi-Language Content Teams! XIX.AI has curated a top-rated list of powerful game-changing tools that go through rigorous real-world tests. You’ll find detailed free vs paid comparison data, comprehensive rankings, and must-try options to help you boost writing efficiency and unlock your creative potential. Explore now to discover your perfect tool for all your content needs!
9 tools
xix.ai
Business
Best AI Competitive Research Tools for Small Businesses
2026 Latest Best Top-rated AI Competitive Research Tools for Small Businesses! XIX.AI has curated a highly powerful game-changing collection, updated weekly with rigorous real-world tests and detailed rankings. You can find a comprehensive free vs paid comparison to help you identify the must-try tools that boost your productivity and give you a competitive edge. Explore now to discover your perfect tool!
9 tools
xix.ai
Image editing
Photoshop AI Retouch Tools for Ecommerce Apparel, Skin Cleanup, and Color Consistency
2026 Latest Best Photoshop AI retouch tools for ecommerce apparel, skin cleanup, and color consistency! This top-rated curated list features powerful game-changing solutions that help you boost writing efficiency, streamline content creation, and achieve perfect visual results effortlessly. Each tool has undergone real-world tests through weekly updated rankings, complete with free vs paid comparison details. Backed by XIX.AI, it’s the must-try guide for anyone aiming to unlock your AI edge. Explore now!
10 tools
xix.ai
Prompt
Best AI Prompt Libraries for ChatGPT Workflows
2026 Latest Best Top-Rated AI Prompt Libraries for optimizing all types of ChatGPT workflows. XIX.AI has curated a powerful, game-changing collection that goes through rigorous real-world tests to ensure top performance. You can find detailed free vs paid comparisons and expert rankings to help you choose the must-try tools that boost your productivity and unlock your AI edge. Explore now!
11 tools
xix.ai

 Comments (4)
0/500
Comments (4)
0/500
![AnthonyHill]()
I tried folding this Bosklapper thing three times and my paper ended up looking like a crumpled napkin 🤦♂️. Maybe I need a PhD in aerodynamics? Still, the boomerang effect sounds cool — if I ever get it right, I'm taking it to the park and confusing some pigeons.
![NicholasLewis]()
Als Kind hab ich immer Papierflieger gebastelt, aber so detaillierte Tutorials gabs nicht. Diese Anleitung ist echt gründlich! Die Idee mit dem ‚Bumerang-Effekt‘ macht mich neugierig, ob das wirklich klappt. Muss ich bei meinem schlechten Faltkünsten echt ausprobieren 😅
![FredBrown]()
Je faisais des avions en papier quand j'étais petit, mais celui-ci a l'air vraiment technique! Le vol en boomerang mentionné me rend très curieux. J’ai des doutes sur la distance de plané annoncée... J’aime l’idée de devenir « ingénieur en avions en papier », mais c’est vrai qu'une vidéo en plus du guide écris aurait pu aider 😅. À essayer ce week-end !
![GeorgeWilliams]()
Just made this and it actually flew back to me! Totally worth the 20 min folding 😂 Can anyone tell me why the tail folds matter so much for the boomerang effect? Might try to teach my cat to fetch it...
Discover your potential as a paper airplane engineer with the Bosklapper! This design, perfected by Jeff Powells, boasts remarkable gliding distance and a unique boomerang flight path. This in-depth tutorial will guide you through every fold, turning a basic sheet of paper into a high-performance flyer. Ideal for newcomers and experienced folders alike, get ready to be impressed by the Bosklapper's aerodynamic excellence. Prepare to rule the skies with your paper creation!
Key Points
The Bosklapper is a paper airplane model created by designer Jeff Powells.
It is an enhanced version featuring superior aerodynamics and a 3D locking system.
This versatile design performs as both a long-distance glider and a returning boomerang.
Its construction difficulty is rated as intermediate.
All you need is a single sheet of A4 or 8.5 x 11 inch paper.
Understanding the Bosklapper Paper Airplane
What is the Bosklapper?
The Bosklapper stands out from typical paper airplanes. Created by Jeff Powells, a champion in paper airplane competitions, it showcases clever aerodynamic design. Its uniqueness lies not only in its smooth, extended glide but also in its ability to circle back like a boomerang, offering twice the entertainment. Renowned for its creative structure and impressive flight performance, it's a popular choice among folding enthusiasts. A key feature is its 3D locking mechanism, which adds crucial in-flight stability. This distinctive element also allows for advanced aerodynamic shaping on the plane's underside, contributing to greater speed and range.
The updated Bosklapper design marks a major improvement on an already excellent foundation. After his contest win, Jeff Powells continued to refine the model, culminating in a final version with better aerodynamic efficiency and an innovative 3D lock that boosts structural strength and stability. Let's learn how to build this impressive aircraft.
Materials and Difficulty
Before starting the folding process, assemble your materials. You only need one sheet of paper, either A4 or standard 8.5 x 11 inch letter size.
The video tutorial uses blue paper, which is optional, but using the same color will make your plane match the demonstration.
In terms of difficulty, the Bosklapper is an intermediate-level project. Some folds demand accuracy, but the clear, step-by-step video instructions will lead you through successfully, even if you are fairly new to paper folding. Be patient, work carefully, and enjoy learning the craft!
Step-by-Step Instructions: Folding the Bosklapper
Step 1: The Initial Fold
Start by folding the paper in half lengthwise, carefully matching one long edge to the opposite edge.
Make sure the edges align perfectly. Press firmly to create a sharp crease. This forms the central reference line for the airplane. Unfold the paper back to a rectangle, leaving a clear center crease needed for the next step.
This initial guideline is fundamental for ensuring the symmetry and balance of all subsequent folds.
Step 2: Creating the Leading Edges
Now, fold the top two corners down toward the center crease. Crucially, leave a tiny gap of about 1mm between the folded edge and the center line. This slight adjustment improves the wing's aerodynamic shape. Repeat on the other side, checking that both folds are symmetrical and the small gap is consistent. This step forms the leading edges of the wings, which are vital for lift and glide.
Step 3: Folding the Nose
Next, fold the top point of the triangle you just created down to the center line, but only make a light pinch crease. A full, hard crease is not needed here.
Then, fold the top point down again, this time to meet the pinch crease you just made. For this fold, create a firm, full crease to continue building the plane's structure.
Step 4: Inverting the Top Fold
Turn the paper over. With the folded side facing down, fold the top edge downward just until the triangular flaps from the first step become visible—about 1mm over. You can unfold and reinforce this crease if needed. Next, perform a mountain fold to tuck those triangular flaps inside. Now, fold this inner edge so it aligns perfectly with the outer edge.
Check that this edge runs parallel to the outer edge, ensuring a clean, squared-off fold.
Step 5: Prepare for Squash Fold
For symmetry, unfold your paper and repeat the previous step's folds on the opposite side. Then, unfold that side, flip the paper over, and fold down along the existing crease you just made.
Once complete, perform a squash fold to flatten the section, preparing the paper for the wing folds.
Step 6: Wing Formation
Now, shape the wings. After completing the squash fold on the other side, the wing design should be more apparent. Simply fold the paper along the natural lines to form the wing, making sure it aligns neatly with the body of the plane.
Step 7: Locking It All Together
To finalize the plane, you need to lock everything in place. Rotate it to the side, and then tuck the tab back in between the layers of the wings.
Your plane will need some upward elevator (a slight upward bend at the back of the wings). As an optional reinforcement, you can apply a small piece of tape to prevent the folds from coming loose during flight.
Pros and Cons of the Bosklapper Design
Pros
Aerodynamic design for long glide times
Capable of boomerang-style returns
Innovative 3D locking mechanism for stability
Assembly becomes straightforward after the initial complex steps.
Cons
The number of steps can be challenging to follow
Precise folding is required for best results
Like all paper planes, it is susceptible to wind
Mastering both glide and boomerang throws requires practice
Frequently Asked Questions (FAQ)
What makes the Bosklapper different from other paper airplanes?
The Bosklapper, designed by Jeff Powells, is unique for merging long-glide performance with boomerang-style return flight. Its improved aerodynamic design and 3D locking mechanism provide exceptional stability, setting it apart from simpler models.
Is the Bosklapper suitable for beginners?
The Bosklapper is an intermediate-level design. Beginners can successfully build it with careful attention to the video tutorial, though some folds require patience and a focus on precision.
What type of paper is best for folding the Bosklapper?
Standard A4 or 8.5 x 11 inch printer paper is ideal. For better gliding, you can experiment with slightly lighter-weight paper.
How can I improve the Bosklapper's flight distance?
Ensure your folds are precise and symmetrical. Fine-tuning the wing elevators (the back edges) and practicing a smooth, level throw will significantly optimize its flight distance.
Can the Bosklapper really return like a boomerang?
Yes, with correct adjustments to the elevators and the right throwing technique, the Bosklapper can execute a reliable boomerang return. It may take some experimentation to perfect.
Related Questions
Where can I find more paper airplane designs and tutorials?
Numerous websites and YouTube channels provide extensive libraries of paper airplane designs and tutorials. Search for phrases like 'advanced paper airplanes,' 'origami flight models,' or 'paper plane tutorials' to find abundant resources. Dedicated sites like Foldable Flight are excellent for discovering new designs.
What are some common paper airplane design principles?
Key principles include: symmetrical wings for balanced flight, a correctly positioned center of gravity for stability, smooth surfaces to minimize air resistance, and properly adjusted control surfaces like elevators for steering. Grasping these concepts can help you modify designs or even create your own original paper aircraft.








 Swedish AI Startup Lovable Eyes $13.2 Billion Valuation After Major Funding Round
As AI-driven coding tools gain traction, Swedish startup Lovable has secured a major funding round. The company aims to raise $3 billion, potentially boosting its valuation to $13.2 billion—double the $6.6 billion recorded last December. Menlo Ventur
Google Tests Remy AI Agent for Gemini as Focus Shifts to User Control
According to Business Insider, Google is testing Remy, a new AI personal agent for Gemini. This tool aims to execute tasks on behalf of users, streamlining both professional workflows and daily routines.Currently, Remy is undergoing testing in an int
Swedish AI Startup Lovable Eyes $13.2 Billion Valuation After Major Funding Round
As AI-driven coding tools gain traction, Swedish startup Lovable has secured a major funding round. The company aims to raise $3 billion, potentially boosting its valuation to $13.2 billion—double the $6.6 billion recorded last December. Menlo Ventur
Google Tests Remy AI Agent for Gemini as Focus Shifts to User Control
According to Business Insider, Google is testing Remy, a new AI personal agent for Gemini. This tool aims to execute tasks on behalf of users, streamlining both professional workflows and daily routines.Currently, Remy is undergoing testing in an int
 How to fix Core Web Vitals for better SEO rankings
Streamline Report Card Comments with AI ToolsIntroductionAI Tools for Generating Report Card CommentsMagic SchoolAlmanac AIChat GPTUsing Magic School to Generate Report Card CommentsLogging into Magic SchoolSelecting the Report Card Comments ToolCust
How to fix Core Web Vitals for better SEO rankings
Streamline Report Card Comments with AI ToolsIntroductionAI Tools for Generating Report Card CommentsMagic SchoolAlmanac AIChat GPTUsing Magic School to Generate Report Card CommentsLogging into Magic SchoolSelecting the Report Card Comments ToolCust

2026 Latest Best Top-Rated AI Outline Generators for Long-Form SEO Articles, meticulously curated by XIX.AI. These powerful tools offer game-changing assistance in creating high-quality content quickly, boosting writing efficiency significantly. Get a free vs paid comparison along with real-world tests and detailed rankings to help you find the must-try option that suits your needs. Explore now to unlock your AI edge.
8 tools
xix.ai

2026 Latest Best AI Study Tools for Homework and Exam Prep! XIX.AI curates a top-rated list of powerful, game-changing tools that help students boost productivity, streamline homework completion, and ace exams through real-world tests. Get a free vs paid comparison, detailed rankings, and must-try options to unlock your AI edge. Explore now!
10 tools
xix.ai

2026 Latest Best AI Vocal Demo Tools for Songwriters, Hook Creators, and Multi-Language Content Teams! XIX.AI has curated a top-rated list of powerful game-changing tools that go through rigorous real-world tests. You’ll find detailed free vs paid comparison data, comprehensive rankings, and must-try options to help you boost writing efficiency and unlock your creative potential. Explore now to discover your perfect tool for all your content needs!
9 tools
xix.ai

2026 Latest Best Top-rated AI Competitive Research Tools for Small Businesses! XIX.AI has curated a highly powerful game-changing collection, updated weekly with rigorous real-world tests and detailed rankings. You can find a comprehensive free vs paid comparison to help you identify the must-try tools that boost your productivity and give you a competitive edge. Explore now to discover your perfect tool!
9 tools
xix.ai

2026 Latest Best Photoshop AI retouch tools for ecommerce apparel, skin cleanup, and color consistency! This top-rated curated list features powerful game-changing solutions that help you boost writing efficiency, streamline content creation, and achieve perfect visual results effortlessly. Each tool has undergone real-world tests through weekly updated rankings, complete with free vs paid comparison details. Backed by XIX.AI, it’s the must-try guide for anyone aiming to unlock your AI edge. Explore now!
10 tools
xix.ai

2026 Latest Best Top-Rated AI Prompt Libraries for optimizing all types of ChatGPT workflows. XIX.AI has curated a powerful, game-changing collection that goes through rigorous real-world tests to ensure top performance. You can find detailed free vs paid comparisons and expert rankings to help you choose the must-try tools that boost your productivity and unlock your AI edge. Explore now!
11 tools
xix.ai

I tried folding this Bosklapper thing three times and my paper ended up looking like a crumpled napkin 🤦♂️. Maybe I need a PhD in aerodynamics? Still, the boomerang effect sounds cool — if I ever get it right, I'm taking it to the park and confusing some pigeons.
Als Kind hab ich immer Papierflieger gebastelt, aber so detaillierte Tutorials gabs nicht. Diese Anleitung ist echt gründlich! Die Idee mit dem ‚Bumerang-Effekt‘ macht mich neugierig, ob das wirklich klappt. Muss ich bei meinem schlechten Faltkünsten echt ausprobieren 😅
Je faisais des avions en papier quand j'étais petit, mais celui-ci a l'air vraiment technique! Le vol en boomerang mentionné me rend très curieux. J’ai des doutes sur la distance de plané annoncée... J’aime l’idée de devenir « ingénieur en avions en papier », mais c’est vrai qu'une vidéo en plus du guide écris aurait pu aider 😅. À essayer ce week-end !
Just made this and it actually flew back to me! Totally worth the 20 min folding 😂 Can anyone tell me why the tail folds matter so much for the boomerang effect? Might try to teach my cat to fetch it...